White offers the c-pawn on move two to take the middle, and the pawn comes back in every line. You play through the take, both defenses, and a full game against an opponent that declines.
Start here
0
Chapter 1: The Offer
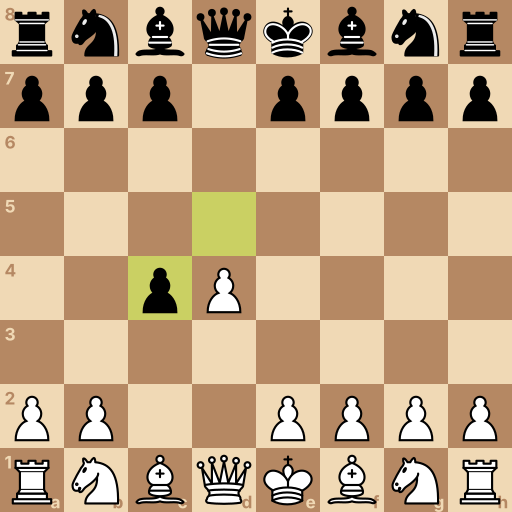
Main line: 1.d4 d5 2.c4 dxc4
Position after 1.d4 d5 2.c4 dxc4. White to move.
A piece in the middle can reach the whole board in a move or two, and a piece on the edge can't. Both players want these four squares, so the opening is the fight over them.
White moves first, so you claim one of the four before they can.
Your move: Push the pawn in front of your queen two squares, to d4, and take your first middle square.
1.d4 Try the pawn in front of your queen — two steps to d4 grabs the middle.
Your move: They answer with d5, and the two pawns block each other. Push your c-pawn two squares to c4 and attack their middle pawn from the side.
2.c4 Not that one — push your c-pawn two squares to c4 and poke their middle pawn.
Question: They take the pawn. What did they give up to get it?
Answer: Their only pawn in the middle. Not quite — that pawn grab cost them their only pawn in the middle. Their d-pawn left the middle to grab yours, and your d4 pawn still stands there. You win the c4 pawn back within a few moves.
They can take the pawn or defend it, and every game from here turns on that choice.
You will learn both answers, starting with the take.
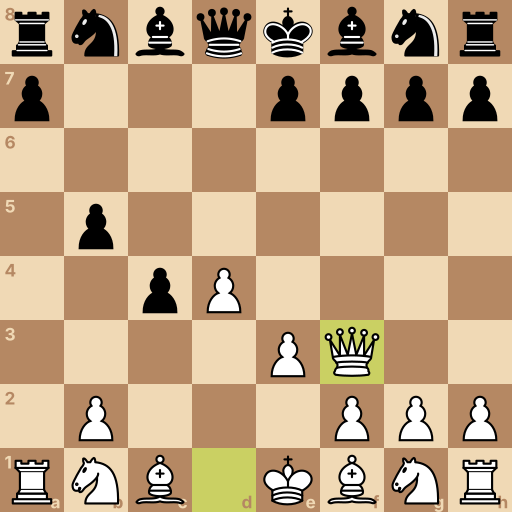
Position after 1.d4 d5 2.c4 dxc4 3.e3 b5 4.a4 c6 5.axb5 cxb5 6.Qf3. Black to move.
Their d-pawn has left the middle for c4, and your d4 pawn is now the only pawn there.
Your plan is to open the f1-bishop's line and take the pawn back. They will try to keep it, and that costs them.
Your move: Push your e-pawn one square to e3, so your f1-bishop looks at the pawn they took.
3.e3 Just a small step — e3 lets your bishop see the pawn they took.
Your move: They push b5 to keep the pawn. Push your a-pawn to a4 and attack that guard at once.
4.a4 Go for the guard — a4 attacks that b5 pawn right away.
Your move: They prop up the guard with c6 — four pawn moves, no pieces out. Take the guard on b5 with your a-pawn.
5.axb5 Take the b5 guard with your a-pawn — if the guard goes, the c4 pawn goes too.
Your move: Their c-pawn takes back, and the long diagonal runs empty to their rook. Move your queen to f3, and its attack carries all the way to the corner.
6.Qf3 Send your queen to f3 — she'll stare right at the rook in the corner.
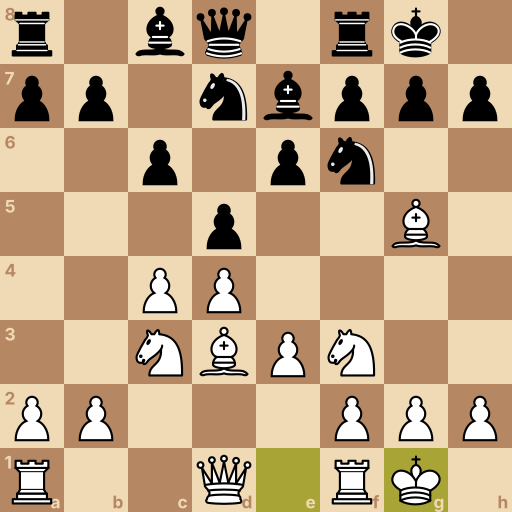
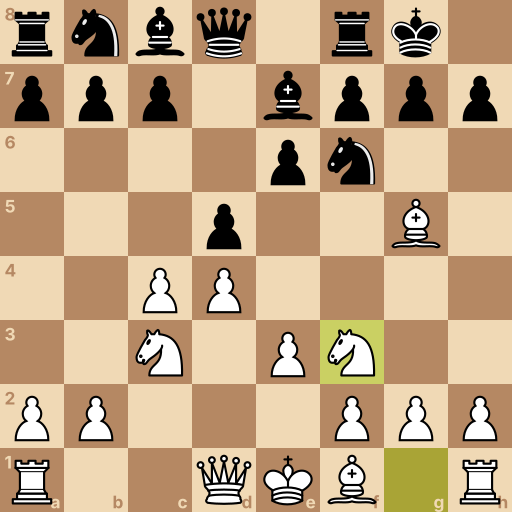
Position after 1.d4 d5 2.c4 e6 3.Nc3 Nf6 4.Bg5 Be7 5.e3 O-O 6.Nf3 Nbd7 7.Bd3 c6 8.O-O. Black to move.
Pawn to e6 defends d5, so if you ever take it, their e-pawn takes back and they keep a pawn in the middle. But e6 also stands on their c8-bishop's diagonal, and that bishop is now shut in behind its own pawns.
Your plan for this chapter is to bring every piece out to its square and then castle.
Your move: Bring the knight beside your queen to c3, where it joins the attack on d5.
3.Nc3 Bring the knight beside your queen to c3 — a second attacker on d5.
Your move: They defend d5 with knight f6. Move your bishop to g5 and pin that knight.
4.Bg5 Slide your bishop to g5 — it pins that knight to the queen.
Your move: They block the pin with bishop e7. Push your e-pawn to e3 and open your other bishop's line.
5.e3 One small step — e3 frees your other bishop.
Your move: They castle. Bring your last knight to f3, its best square for watching the middle.
6.Nf3 Bring your last knight to f3 — its favorite square.
Your move: Your f1-bishop is the last piece blocking your castling, so move it out to d3.
7.Bd3 Move that bishop to d3 — it clears the way for your king.
Your move: They shore up with c6. Everything is placed, so castle by moving your king two squares right.
8.O-O Time to castle — slide your king two squares to the right.
Question: So how do you beat the e6 defense?
Answer: Pieces out, castle, keep leaning on the middle. No rush — just get your pieces out, castle, and keep leaning. Your pieces breathe, theirs are cramped behind e6, and the pressure on d5 never goes away.
Chapter 4: The Slav Defense
Main line: 1.d4 d5 2.c4 c6 3.Nf3 Nf6 4.e3
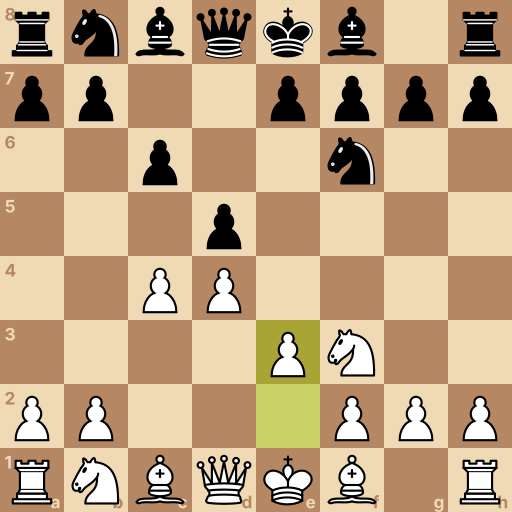
Position after 1.d4 d5 2.c4 c6 3.Nf3 Nf6 4.e3. Black to move.
The c6 pawn guards d5 the same way e6 did, but nothing stands on the c8-bishop's diagonal now, so the last chapter's problem never appears.
The catch is that c6 was the natural square for their b8-knight, so that knight lost its best home before it ever moved.
Your move: Bring your knight to f3 first, where it covers e5 and clears your kingside for castling.
3.Nf3 Start with your knight to f3 — it keeps every option open.
Your move: They bring out knight f6. Push your e-pawn to e3 to prop up d4 and free your f1-bishop.
4.e3 One little step — e3 props up d4 and frees your bishop.
Question: So what is the plan against the Slav?
Answer: Pieces out, castle, keep leaning on the middle. No quick win here — pieces out, castle, and keep the squeeze. They defended d5 just like the e6 line, but with the bishop free and the knight's best square gone. You develop, castle, and keep your share of the middle.
Final challenge: The Decliner (800 Elo)
The opponent says: I don't take the pawn. Let's see your plan.
Your tasks in the game, in order:
Bring your knight to c3, the second attacker on d5.
Pin their f6-knight by moving your bishop to g5.
Open your f1-bishop's line with pawn to e3.
Bring your last knight to f3.
Position after 1.d4 d5 2.c4 e6 3.Nc3 Nf6 4.Bg5 Be7 5.e3 O-O 6.Nf3. Black to move.
History of the Queen's Gambit
The Queen's Gambit begins 1.d4 d5 2.c4 and spans ECO D06 to D69 across accepted, declined, and Slav structures; the name refers to the offered queenside c-pawn, not the queen. The opening appeared in surviving analysis from the late fifteenth century and became established in tournament play during the nineteenth century.
Main ideas for White
White uses 2.c4 to attack d5 from the side and gain more central space. If Black accepts with 2...dxc4, 3.e3 opens the f1 bishop's route to c4, while 4.a4 can undermine a supporting pawn on b5. Against the Queen's Gambit Declined, 3.Nc3 and 4.Bg5 increase pressure on d5 and f6; against the Slav Defense, 3.Nf3 and 4.e3 develop safely while Black supports d5 with c6.
Typical plans
Queen's Gambit middlegames usually leave White with central space and pressure on the c-file and d-file, while Black seeks freeing play against the center. In declined structures White may prepare an e4 break, create a queenside minority advance toward b5, or play against the c8 bishop. In accepted structures White regains the pawn on c4 and develops quickly; Black commonly uses a c5 or e5 pawn break to challenge d4.
Common mistakes
Assuming the offered c4 pawn is permanently lost can provoke a rushed queen sortie; prepare recovery with an e-pawn advance and normal development instead.
Attacking d5 repeatedly before developing the kingside can leave White uncastled; bring out both knights and the f1 bishop first.
Trading on d5 without considering the resulting structure can release Black's position; decide whether central tension supports an e4 break or queenside play.
Related openings
London System1.d4 d5 2.Bf4. The same solid house nearly every game.
Catalan Opening1.d4 Nf6 2.c4 e6 3.g3 d5 4.Bg2. One bishop presses their queenside all game.
Trompowsky Attack1.d4 Nf6 2.Bg5. Bishop out on move two, their prep out the window.
King's Indian Defense1.d4 Nf6 2.c4 g6. Let them build the middle, then strike it down.
Slav Defense1.d4 d5 2.c4 c6. Guard the middle and keep your bishop free.
Dutch Defense1.d4 f5. Claim e4 with a wing pawn and storm their king.
Grünfeld Defense1.d4 Nf6 2.c4 g6 3.Nc3 d5. Hand them the big middle, then hammer it.
Nimzo-Indian Defense1.d4 Nf6 2.c4 e6 3.Nc3 Bb4. Pin the knight and own e4 without a pawn.