You pin the knight that fights for e4, and either own that square forever or wreck their pawns taking it. You play the pin, both replies, and a full game against an opponent that shrugs the pin off.
Start here
0
Chapter 1: The Pin
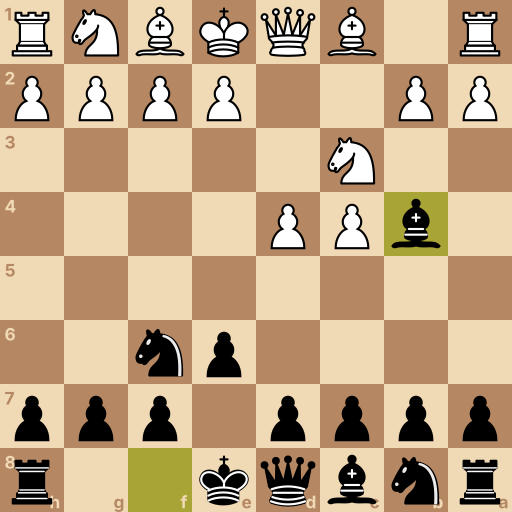
Main line: 1.d4 Nf6 2.c4 e6 3.Nc3 Bb4
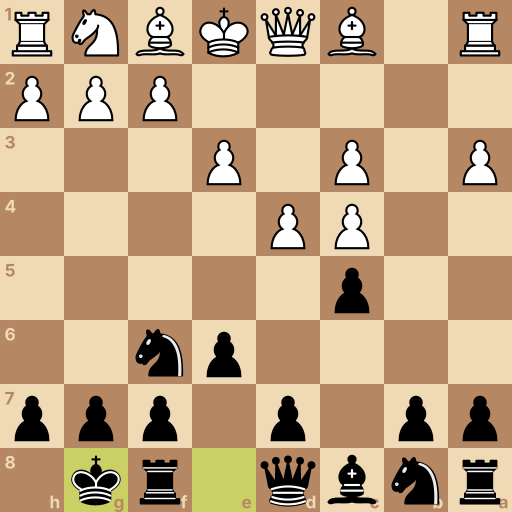
Position after 1.d4 Nf6 2.c4 e6 3.Nc3 Bb4. White to move.
These four squares are the middle of the board. A piece standing near them reaches everywhere; a piece stuck on the edge reaches half as far.
White moves first and wants both middle squares on their side — d4 now, e4 next. This defense is a plan to make sure e4 never happens.
Your move: They open with the queen's pawn. Bring your kingside knight to f6 — the first watcher on e4.
1...Nf6 The knight in front of your rook — one jump to f6 watches e4.
Your move: They add c4. One step with your e-pawn opens the road for the bishop this opening is named for.
2...e6 One step with the e-pawn — it opens the dark bishop's diagonal.
Your move: Their knight jumps to c3 — the piece whose whole job is pushing e4. Pin it: bishop to b4, and that knight is frozen against their king.
3...Bb4 The bishop pins the c3 knight to the king — the e4-pusher is frozen.
Question: What did the pin just take away from them?
Answer: The e4 push — the pinned knight fights for nothing. Ask what the c3 knight was developed to do. The knight went to c3 to support e4 — and a pinned piece supports nothing. Your knight watches e4, theirs only pretends to. One bishop move canceled their whole middle plan. That is the Nimzo-Indian.
This is the Nimzo-Indian Defense. Three moves, and the fight for e4 is already going your way.
They can shoo the bishop with a3 or shrug and play on. The next chapters answer both.
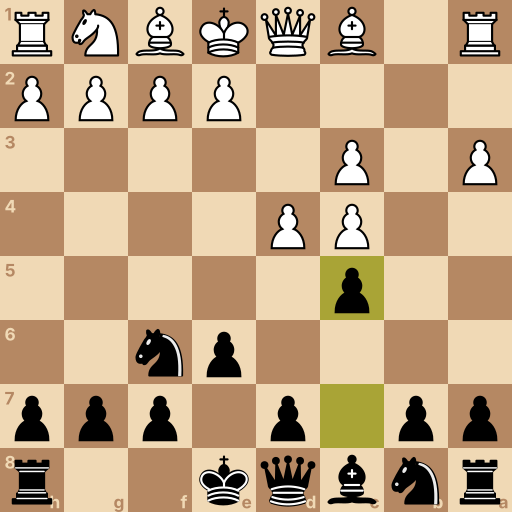
Position after 1.d4 Nf6 2.c4 e6 3.Nc3 Bb4 4.a3 Bxc3+ 5.bxc3 c5. White to move.
They poke the bishop with a3 and ask its intentions. Answer honestly: take the knight.
The trade looks generous — bishop for knight — until you watch what happens to their pawns.
Your move: Take the c3 knight, with check.
4...Bxc3+ The bishop takes the knight it was pinning — and wrecks the pawns next.
Your move: They take back with the b-pawn — and now two white pawns stand stacked on the c-file, unable to ever guard each other. Fix them in place: push c5.
5...c5 The c-pawn steps to c5 and freezes their doubled pawns where they stand.
Question: Bishop for knight, and their pawns are doubled. Who won the trade?
Answer: You — the doubled c-pawns are weak for the rest of the game. Doubled pawns can never guard each other — ask who guards c4 now. Their c4 pawn can never be defended by another pawn again, and your whole plan is to lean on it. The bishop pair is real compensation — but a target that lasts fifty moves is the better half of this deal.
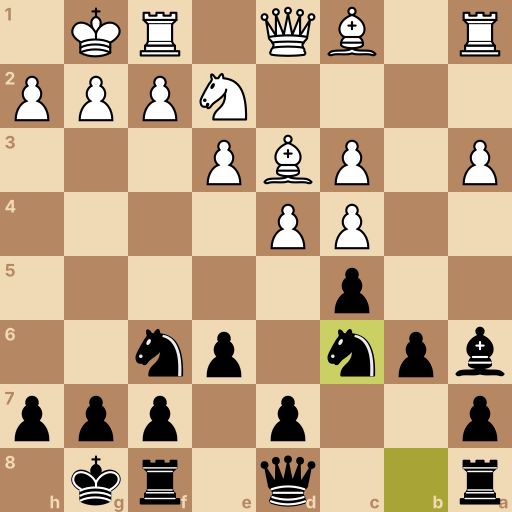
Position after 1.d4 Nf6 2.c4 e6 3.Nc3 Bb4 4.a3 Bxc3+ 5.bxc3 c5 6.e3 O-O 7.Bd3 b6 8.Ne2 Ba6 9.O-O Nc6. White to move.
They shore up the middle. Your plan for the whole game fits in one sentence: pile everything on the c4 pawn that no pawn can ever guard.
First the king tucks in, then the hunters take their posts.
Your move: Castle — two squares toward the corner.
6...O-O Two squares toward the corner — the rook jumps over by itself.
Your move: They develop the bishop. One step with your b-pawn opens the diagonal that leads straight to the crippled pawn.
7...b6 One step with the b-pawn — the light bishop's new road opens.
Your move: They develop a knight. Now the strange-looking star move: bishop to a6 — from the edge of the board it does exactly one thing, and that thing is attack c4.
8...Ba6 The bishop slides to a6 and stares straight at the c4 pawn.
Your move: They castle. Send the second hunter: knight to c6, on its way to a5, where it too will bite at c4.
9...Nc6 The knight heads for a5 through c6 — a second attacker on the frozen pawn.
Question: Bishop on a6, knight heading to a5, both aimed at one pawn. Why is this winning chess and not just stubbornness?
Answer: Defending one frozen pawn ties their pieces down everywhere else. Watch what their queen and rook have to do while your pieces aim. Every defender assigned to c4 is a piece not fighting anywhere else. You attack a pawn; they defend with their queen's time and their rooks' squares. Win it or not, you own the initiative for the whole middlegame.
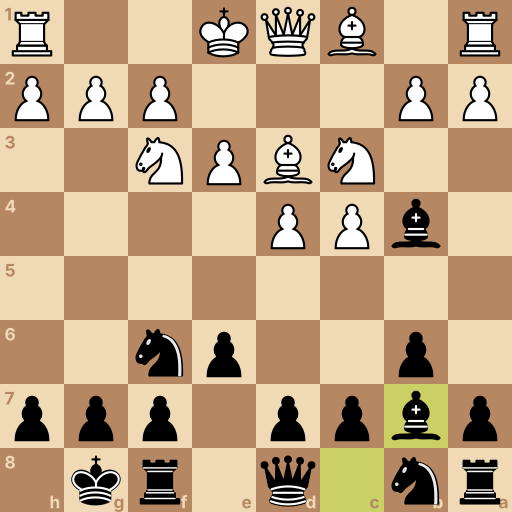
Position after 1.d4 Nf6 2.c4 e6 3.Nc3 Bb4 4.e3 O-O 5.Nf3 b6 6.Bd3 Bb7. White to move.
Some opponents just shrug — a quiet e3, no questions asked of your bishop.
Fine. An unanswered pin keeps working every single move.
Your move: Castle — two squares toward the corner. The pin holds itself.
4...O-O Two squares toward the corner — the pin needs no babysitting.
Your move: They develop. One step with your b-pawn — a second piece is about to join the e4 fight.
5...b6 One step with the b-pawn opens the light bishop's diagonal toward e4.
Your move: They develop again. Bishop to b7 — now count the fighters for e4: your knight, this bishop, and their knight still pinned.
6...Bb7 The bishop joins from b7 — e4 is watched twice, guarded by a frozen piece.
Question: You never put a pawn on e4 and never will. Do you own the square anyway?
Answer: Yes — two real watchers against one frozen one means e4 is yours. Count who can actually use e4 and who can actually stop them. Control is about force, not occupation. Knight and bishop watch e4; the pinned c3 knight only pretends to. If they ever push e4 anyway, it costs them material or the pawn structure. The shrug changed nothing — the pin runs the game.
Final challenge: The Shaker (800 Elo)
The opponent says: A pin? I'll shake it right off. Watch.
Your tasks in the game, in order:
Pin the e4-pusher — bishop to b4.
They poke with a3 — take the knight and wreck the pawns.
Freeze the doubled pawns — push c5.
Castle — the hunt can start with your king safe.
Position after 1.d4 Nf6 2.c4 e6 3.Nc3 Bb4 4.a3 Bxc3+ 5.bxc3 c5 6.e3 O-O. White to move.
History of the Nimzo-Indian Defense
The Nimzo-Indian Defense begins 1.d4 Nf6 2.c4 e6 3.Nc3 Bb4 and occupies ECO codes E20 through E59. It is named for Aron Nimzowitsch, who developed and popularized its blockade and piece-control ideas. The opening became established in master play during the 1920s and remains a principal way to prevent White from building an unrestricted pawn center.
Main ideas for Black
Black pins the c3 knight to the king, reducing White's control of e4 without immediately occupying the center with pawns. The f6 knight also watches e4, and the c8 bishop can join that pressure from b7 after the b-pawn moves to b6. White may challenge the bishop with 4.a3 Bxc3+ 5.bxc3, accepting doubled c-pawns, or play 4.e3 and continue development while preserving the bishop-pair question.
Typical plans
After 4.a3 Bxc3+ 5.bxc3, White has the bishop pair and doubled c-pawns, while Black has lasting targets on c4 and c3. Black often fixes the structure by advancing the c-pawn to c5, castles kingside, develops the c8 bishop through a6 or b7, and sends the b8 knight through c6 toward a5. White seeks central expansion and kingside chances; Black pressures the c-file, restrains e4, and may use a d5 pawn break.
Common mistakes
Exchanging on c3 automatically can surrender the bishop pair without gaining a target; capture only when the doubled pawns or center justify it.
After creating doubled c-pawns, switching immediately to a kingside attack wastes the structural gain; pressure c4 and restrain e4 instead.
Leaving the king in the center while maneuvering against c4 invites tactics; castle first, then add the a6 bishop and c6 knight.
Related openings
King's Indian Defense1.d4 Nf6 2.c4 g6. Let them build the middle, then strike it down.
Slav Defense1.d4 d5 2.c4 c6. Guard the middle and keep your bishop free.
Dutch Defense1.d4 f5. Claim e4 with a wing pawn and storm their king.
Grünfeld Defense1.d4 Nf6 2.c4 g6 3.Nc3 d5. Hand them the big middle, then hammer it.
Queen's Indian Defense1.d4 Nf6 2.c4 e6 3.Nf3 b6. Control e4 from the corner, at a distance.
Bogo-Indian Defense1.d4 Nf6 2.c4 e6 3.Nf3 Bb4+. A check on move three that develops for free.
Benoni Defense1.d4 Nf6 2.c4 c5 3.d5 e6. Lure the push, then march your majority.
Benko Gambit1.d4 Nf6 2.c4 c5 3.d5 b5. One pawn buys two open files, forever.