You let them build a big pawn middle, tuck your bishop onto the long diagonal, and then strike the middle they built. You play the setup, both replies, and a full game against an opponent that trades the queens off to stop you.
Start here
0
Chapter 1: The Long Diagonal
Main line: 1.d4 Nf6 2.c4 g6 3.Nc3 Bg7 4.e4
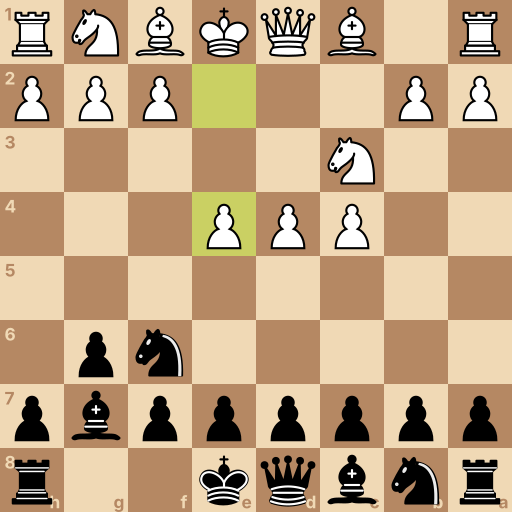
Position after 1.d4 Nf6 2.c4 g6 3.Nc3 Bg7 4.e4. Black to move.
These four squares are the middle of the board. A piece standing near them reaches everywhere; a piece stuck on the edge reaches half as far.
White moves first and will start filling the middle with pawns. Most defenses fight back at once. This one lets them build — and aims at the whole thing from one diagonal.
1.d4 — their pawn takes a middle square, and c4 usually comes next. Let it.
Every pawn they push forward is a pawn that can be attacked later. Your job for now is to get your own pieces onto their best squares.
Your move: Bring your kingside knight to f6. It watches e4 from the side — their pawns can't have everything.
1...Nf6 The knight in front of your rook — one jump to f6, toward the middle.
Your move: They push c4, claiming more ground. One small step with your g-pawn opens the long diagonal — the road your bishop will live on.
2...g6 One step with the g-pawn — it opens the door for your dark bishop.
Your move: Their knight comes out. Slide your bishop to g7 — it sits safe beside your king, and every trade and pawn break you play from here works to open its diagonal.
3...Bg7 The dark bishop tucks into the corner you just opened — g7.
Question: They built the big middle you allowed — pawns on c4, d4, and e4. Why let them have it?
Answer: Big pawn middles make big targets — your whole setup aims to hit this one. Look at what your bishop and your coming pawn strike both point at. Every pawn they pushed is something to attack. Your bishop is aimed through the middle, and the e5 strike is coming to crack it open. Their proud pawn wall becomes the target — that is the King's Indian bargain.
This is the King's Indian Defense. They own the middle for now; you own the plan against it.
Before the fight starts, your king tucks in. The next chapter builds the little house.
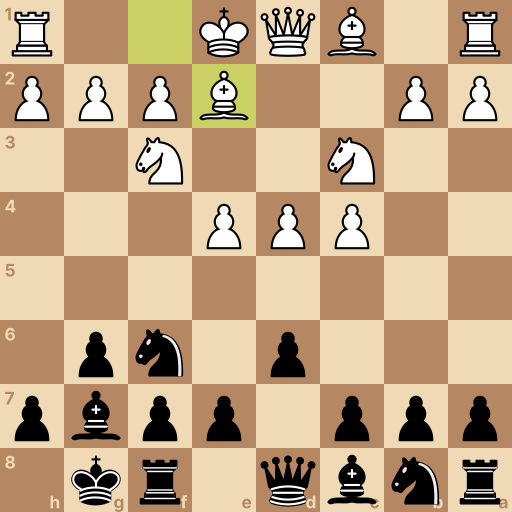
Position after 1.d4 Nf6 2.c4 g6 3.Nc3 Bg7 4.e4 d6 5.Nf3 O-O 6.Be2. Black to move.
Two quiet moves before any fight: a small pawn prop, and the castle.
The prop is d6 — it holds the e5 square, so that when your strike lands there it lands guarded.
Your move: Play the small prop, one step to d6. It guards e5 — the square your whole plan runs through.
4...d6 One step with the d-pawn — it guards e5 for the strike to come.
Your move: Their knight comes out. Castle — king two squares toward the corner, tucked behind the bishop you already posted.
5...O-O Two squares toward the corner — the rook jumps over by itself.
Question: They develop calmly and your king is safe. When does the strike come?
Answer: Now — everything it needs is ready. Count what already supports the e5 square. King safe, bishop posted, d6 guarding — the strike needs nothing more. Next chapter you play e5, and the fight starts on your terms.
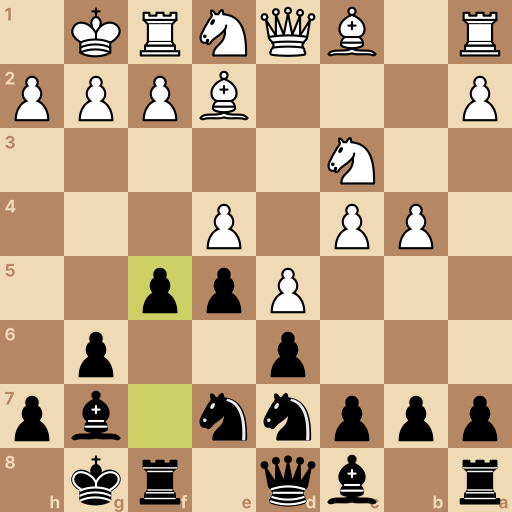
Position after 1.d4 Nf6 2.c4 g6 3.Nc3 Bg7 4.e4 d6 5.Nf3 O-O 6.Be2 e5 7.O-O Nc6 8.d5 Ne7 9.Ne1 Nd7 10.b4 f5. White to move.
Everything is placed. Now the move the whole opening exists for: e5, striking the middle they built.
However they answer, you know your next job — this chapter plays the main reply, where the middle closes and the race begins.
Your move: Push your e-pawn two squares, to e5, and hit their d4 pawn. The fight for their big middle starts now.
6...e5 The e-pawn, two steps — it lands guarded by d6 and hits d4.
Your move: They castle instead of taking. Add a second attacker on d4 — your other knight, out to c6.
7...Nc6 The knight beside your rook — one jump to c6 adds a hit on d4.
Your move: They push d5, shutting the middle and poking your knight. Step it to e7 — from there it jumps into the attack through g6 or f5.
8...Ne7 The poked knight steps back to e7, headed for g6 or f5 later.
Your move: Their knight steps back to make room for pawns on the far side. Match it: your f6 knight drops to d7 — and now nothing stands in front of your f-pawn.
9...Nd7 The f6 knight tucks back to d7 and clears the f-pawn's road.
Your move: They start their play on the far side. Answer on yours: push your f-pawn two squares, to f5 — the pawn storm at their king begins.
10...f5 The f-pawn, two steps — its road is clear and the storm starts.
Question: Two attacks are running at once — theirs on the far side, yours at their king. What wins this race?
Answer: Keep pushing at the king — the pawns keep marching. Compare the two targets: they attack squares, you attack the king. This is the bargain paid off: they get the far side, you get the king. The attack on the king moves faster, because every pawn step carries a threat. Push, and don't look back.
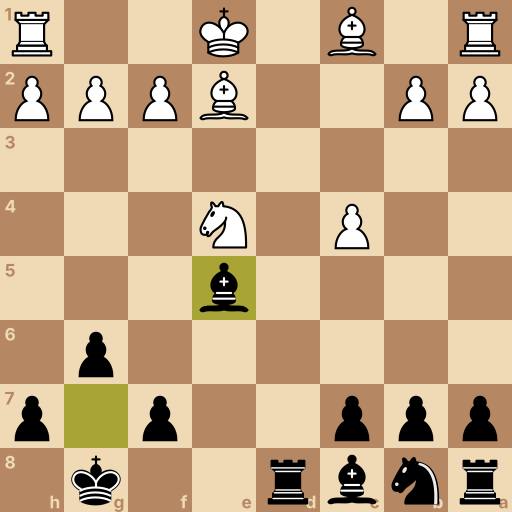
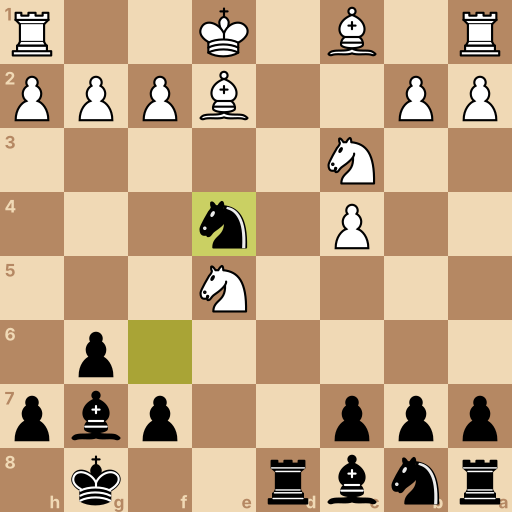
Position after 1.d4 Nf6 2.c4 g6 3.Nc3 Bg7 4.e4 d6 5.Nf3 O-O 6.Be2 e5 7.dxe5 dxe5 8.Qxd8 Rxd8 9.Nxe5 Nxe4 10.Nxe4 Bxe5. White to move.
Some opponents meet your strike by trading everything — pawn takes, then queens off. It looks like it kills your game.
Play it out. The trap at the end of this line is theirs to fall into, not yours.
Your move: Take back with your d-pawn.
7...dxe5 The d6 pawn takes back on e5 — the prop does its job.
Your move: They trade queens. Take back with your rook — it lands on the open middle file and stands active there.
8...Rxd8 Take back with the rook — it lands on the open d-file.
Your move: They grab your e5 pawn — the move this whole line was for. Now the spring: take their e4 pawn with your knight. If their knight takes back, your bishop eats theirs on e5.
9...Nxe4 Your f6 knight takes on e4 — the g7 bishop covers everything behind it.
Your move: Knights come off — now collect their knight on e5 with your bishop. Material even, and your bishop stands in the middle where their pawn wall used to be.
10...Bxe5 The long-diagonal bishop takes the knight on e5 — its road is open now.
Question: Queens off, material even. Did their trading plan work?
Answer: No — your bishop rules the middle and your rook owns the open file. Look at your two most active pieces, then look for their best one. Their 'safe' line left you the better game: bishop in the middle, rook on the open file, not a weakness anywhere. Queens or no queens, the King's Indian survives the trade just fine.
Final challenge: The Trader (800 Elo)
The opponent says: Big attack coming? I'll just trade the queens off, thanks.
Your tasks in the game, in order:
Strike the middle — e-pawn two squares, to e5.
They take — take back with the d-pawn.
Queens come off — take back with your rook, onto the open file.
They grab e5 — spring the trap: knight takes on e4.
Position after 1.d4 Nf6 2.c4 g6 3.Nc3 Bg7 4.e4 d6 5.Nf3 O-O 6.Be2 e5 7.dxe5 dxe5 8.Qxd8 Rxd8 9.Nxe5 Nxe4. White to move.
History of the King's Indian Defense
The King's Indian Defense is defined by 1.d4 Nf6 2.c4 g6 3.Nc3 Bg7 4.e4 d6 and occupies ECO codes E60 through E99. Its name places it among the Indian defenses, openings in which Black answers 1.d4 with Nf6 rather than d5. It became firmly established in top-level tournament play during the late 1940s and 1950s.
Main ideas for Black
Black allows White to build a pawn center on c4, d4, and e4 while developing Nf6 and the bishop on g7. The bishop uses the a1-h8 diagonal, Nf6 watches e4, and d6 supports the central break e5. Black normally castles kingside before challenging the center. White uses the space to develop freely and often closes the center with d5, aiming for queenside expansion while Black prepares kingside activity.
Typical plans
After e5 and d5 close the center, the pawn chains point play toward opposite wings. Black reroutes the c6 knight through e7, clears the f-pawn, and advances f5 to attack White's king; White commonly expands with b4 and c5 on the queenside. Black may use c5 instead of e5 in other structures. If White exchanges on e5 and trades queens, Black can use the open d-file and active g7 bishop rather than forcing a kingside attack.
Common mistakes
Playing f5 before castling can expose the king and leave e6 weak; finish the g7 bishop setup and castle first.
Trying to stop every queenside pawn move wastes time in a closed center; create counterplay with f5 while White expands there.
Trading the g7 bishop without a concrete gain removes a main attacker; keep it unless the exchange changes the center or wins material.
Related openings
Slav Defense1.d4 d5 2.c4 c6. Guard the middle and keep your bishop free.
Dutch Defense1.d4 f5. Claim e4 with a wing pawn and storm their king.
Grünfeld Defense1.d4 Nf6 2.c4 g6 3.Nc3 d5. Hand them the big middle, then hammer it.
Nimzo-Indian Defense1.d4 Nf6 2.c4 e6 3.Nc3 Bb4. Pin the knight and own e4 without a pawn.
Queen's Indian Defense1.d4 Nf6 2.c4 e6 3.Nf3 b6. Control e4 from the corner, at a distance.
Bogo-Indian Defense1.d4 Nf6 2.c4 e6 3.Nf3 Bb4+. A check on move three that develops for free.
Benoni Defense1.d4 Nf6 2.c4 c5 3.d5 e6. Lure the push, then march your majority.
Benko Gambit1.d4 Nf6 2.c4 c5 3.d5 b5. One pawn buys two open files, forever.