Learn the King's Indian Attack, one move at a time.
You build the same six-move house no matter what they play, then push e5 and walk your pieces at their king. You play the setup, both replies, and a full game against an opponent that plays something different every time.
Start here
0
Chapter 1: One House
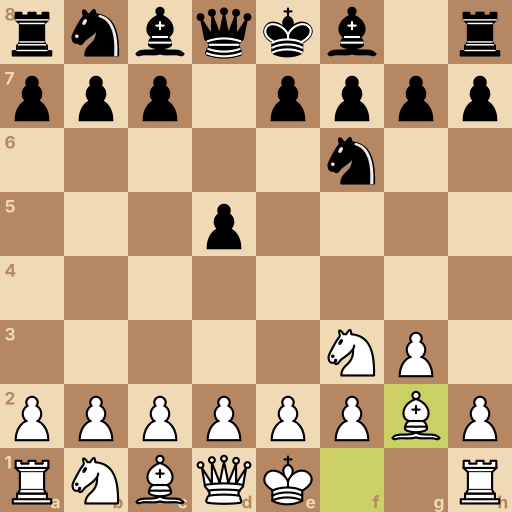
Main line: 1.Nf3 d5 2.g3 Nf6 3.Bg2
Position after 1.Nf3 d5 2.g3 Nf6 3.Bg2. Black to move.
These four squares are the middle of the board. A piece standing near them reaches everywhere; a piece stuck on the edge reaches half as far.
White moves first. This opening's promise: the same six moves, in nearly any order, against nearly anything they play.
Your move: Start with the knight to f3 — it watches e5 and d4, and no reply of theirs changes your plan.
1.Nf3 The knight beside your king's rook — the house always starts here.
Your move: They take the middle. One step with your g-pawn — the bishop's corner opens.
2.g3 One step with the g-pawn — brick two of the same house.
Your move: They develop. Bishop to g2 — it guards your king's future home and watches the long diagonal.
3.Bg2 The bishop tucks into g2 — brick three, same as always.
Question: They could have played almost anything these two moves. Would your moves have changed?
Answer: No — that is the whole point: one house, built the same way every game. That reliability is why people play this opening. Knight, pawn, bishop — the same three moves against nearly everything, with castle, d3, and the other knight still to come. You spend your thinking on the middlegame while they spend theirs on the opening. That is the King's Indian Attack.
This is the King's Indian Attack — the King's Indian Defense's plan, played a move up as White.
Three bricks remain: castle, d3, and the queen's knight. The next chapter lays them.
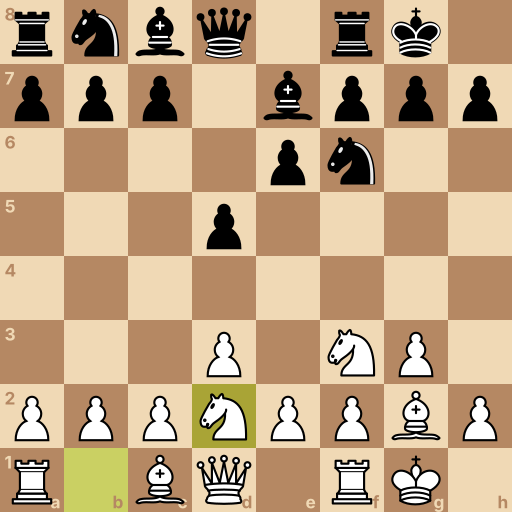
Position after 1.Nf3 d5 2.g3 Nf6 3.Bg2 e6 4.O-O Be7 5.d3 O-O 6.Nbd2. Black to move.
Three bricks left, and each takes one move: the castle, the modest d3, and the knight that will back the e4 push.
Lay them in order and the house is done by move six.
Your move: Castle — two squares toward the corner, behind the bishop you just posted.
4.O-O Two squares toward the corner — the rook jumps over by itself.
Your move: They develop. One step with the d-pawn, to d3 — it holds e4 ready without blocking your bishop.
5.d3 One modest step — d3 supports the coming e4 push.
Your move: They castle. The last brick: queen's knight to d2, where its one job is backing the e4 push.
6.Nbd2 The queenside knight tucks into d2, behind the e4 push.
Question: The house is finished by move six. What did all this modesty buy?
Answer: A safe king, zero weaknesses, and the e4 push loaded and ready. Find one thing in your camp they can attack — then look at e4. No targets, king tucked in, and every piece supports the same coming move. Modest setups aren't passive — this one is a spring, compressed. Next chapter it releases.
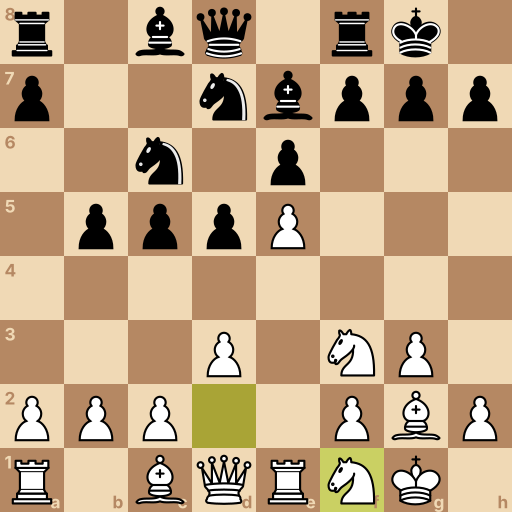
Position after 1.Nf3 d5 2.g3 Nf6 3.Bg2 e6 4.O-O Be7 5.d3 O-O 6.Nbd2 c5 7.e4 Nc6 8.Re1 b5 9.e5 Nd7 10.Nf1. Black to move.
They grab queenside space — their play is over there. Yours starts now: e4, then the wedge, then the march at their king.
This is the race this opening lives for, and your side of it is faster.
Your move: Release the spring — push e4.
7.e4 The e-pawn, two steps — the push the whole house was built for.
Your move: They develop and keep their middle. Slide your rook to e1 — behind the pawn that is about to advance.
8.Re1 The rook steps to e1, backing the e-pawn's march.
Your move: They expand on the far side — let them. Drive the wedge: push e5, kicking their knight and splitting the board in two.
9.e5 The e-pawn advances to e5 — the wedge lands and their knight must move.
Your move: Their knight retreats. Begin the famous march: knight back to f1 — it looks backward, but it is headed through h2 or e3 toward their king.
10.Nf1 The d2 knight re-routes through f1 — next stop, their king's side.
Question: Their pawns run on the far side while your pieces walk at their king. Who wins this race?
Answer: You — attacks on the king carry threats every move, and the wedge keeps defenders out. Their gains win squares; your gains threaten the king — compare the stakes. The e5 wedge shuts their pieces out of the defense, and every step of yours — knight to g4 or e3, queen across, h-pawn forward — comes with a threat. They win space; you play for the king. Those stakes are not equal.
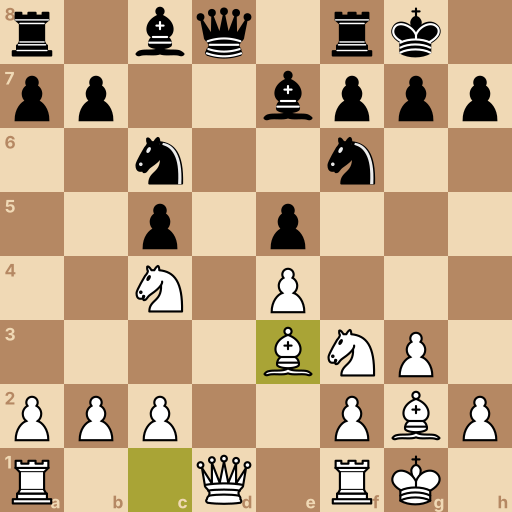
Position after 1.Nf3 d5 2.g3 Nf6 3.Bg2 e6 4.O-O Be7 5.d3 O-O 6.Nbd2 c5 7.e4 dxe4 8.dxe4 e5 9.Nc4 Nc6 10.Be3. Black to move.
Instead of holding the middle, they trade it away. Take back and look at the square their pawn just abandoned.
No black pawn can ever guard d5 again — that hole is where your pieces are going.
Your move: Take back with your d-pawn.
8.dxe4 The d-pawn takes back — your middle holds, theirs is gone.
Your move: They seal the middle with e5 — and lock in the hole on d5 forever. Start the journey: knight to c4, on its way to that square.
9.Nc4 The knight heads for the d5 hole by way of c4.
Your move: They develop. Bishop to e3 — it eyes their c5 pawn and clears the way for rooks to the middle.
10.Be3 The dark bishop develops to e3, leaning on c5.
Question: The middle is locked and quiet. Where is your win hiding?
Answer: On d5 — plant a knight in the hole and the whole board tilts your way. Find the square in their half that no black pawn can ever attack. A knight on d5 attacks in every direction, can never be chased by a pawn, and costs them a piece to remove. Route yours there — through e3 — and trade pieces on your terms. Quiet positions still have addresses worth owning.
Final challenge: The Wildcard (800 Elo)
The opponent says: I never play the same thing twice. Good luck preparing for me.
Your tasks in the game, in order:
Brick three — bishop to g2.
Castle — two squares toward the corner.
The modest d3 — e4 loads behind it.
The last brick — queen's knight to d2.
Position after 1.Nf3 d5 2.g3 Nf6 3.Bg2 e6 4.O-O Be7 5.d3 O-O 6.Nbd2. Black to move.
History of the King's Indian Attack
The King's Indian Attack commonly starts 1.Nf3 d5 2.g3 Nf6 3.Bg2, followed by kingside castling and a setup with pawns on d3 and e4 and the queen knight on d2. Its positions are generally classified under ECO A07 and A08. The name comes from applying the formation of the related defense with White, and the system became established in master play during the mid-twentieth century.
Main ideas for White
White develops the king knight to f3, fianchettoes the light bishop on g2, castles, and supports an e4 pawn advance with the d-pawn and queen knight. The bishop controls the g2-a8 diagonal, while the e-pawn can advance again to e5 and dislodge a knight on f6. A rook on e1 supports this wedge, and the d2 knight often reroutes through f1 toward e3, g3, or h2. Black usually occupies d5, develops behind an e6 pawn, and expands with c5 and b5 on the queenside.
Typical plans
With pawns on d3 and e4, White often closes the center by advancing the e-pawn to e5, then shifts pieces toward the kingside. The rook belongs on e1, the queen may join through e2, and a knight can reach e3 or g4 while the h-pawn gains space. Black normally seeks queenside play with c5 and b5, so both sides often attack on opposite wings. If Black exchanges on e4 and later advances the e-pawn, White can recapture from d3 and use d5 as a knight outpost.
Common mistakes
Advancing the e-pawn before castling and completing the setup can leave it underdefended; place the d-pawn and queen knight first.
Leaving the e5 pawn unsupported allows Black to attack the wedge; put a rook on e1 before starting the kingside maneuver.
Following one fixed setup after Black exchanges the center misses the d5 outpost; recapture from d3 and redirect the queen knight there.
Related openings
English Opening1.c4 e5 2.Nc3. Grip the middle from the side and squeeze.
Réti Opening1.Nf3 d5 2.c4. Press their middle without offering a target.
Bird's Opening1.f4. Claim e5 from the wing and attack the king.