You offer your g-pawn on move one as pure bait, and the counterattack on their queenside starts before they finish smiling. You play the bait, both replies, and a full game against an opponent that grabs everything in sight.
Start here
0
Chapter 1: The Bait
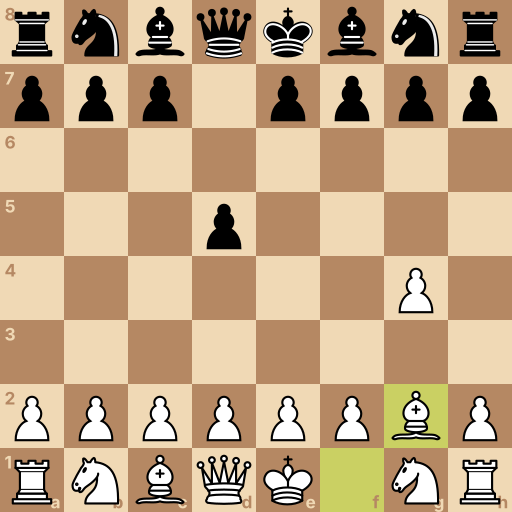
Main line: 1.g4 d5 2.Bg2
Position after 1.g4 d5 2.Bg2. Black to move.
These four squares are the middle of the board. A piece standing near them reaches everywhere; a piece stuck on the edge reaches half as far.
White moves first — and this first move is the most surprising in chess. It hangs a pawn on purpose, to drag their pieces where you want them.
Your move: Push your g-pawn two squares, to g4. Yes, it can be taken. That is the idea.
1.g4 The g-pawn, two steps — bait, hung in plain sight.
Your move: They take the middle with d5, eyeing your pawn. Bishop to g2 — it stares through their new pawn at b7, the square your whole plan feeds on.
2.Bg2 The bishop takes the long diagonal — d5 and b7 are both in its sights.
Question: If they take the g4 pawn with their bishop, what have they really done?
Answer: Sent their only developed piece to the edge while your bishop aims at their queenside. Look where the capturing bishop ends up, and what it left behind. The bishop that grabs g4 stands offside on the rim, and the b7 pawn it abandoned sits on your bishop's diagonal. You spent a pawn to decide where their pieces go. Whether that's brave or reckless — it's the Grob, and it has teeth.
This is the Grob Opening. The bait hangs, the bishop aims, and the counterattack is loaded.
The next chapter plays the main line: they take, and your queenside raid begins.
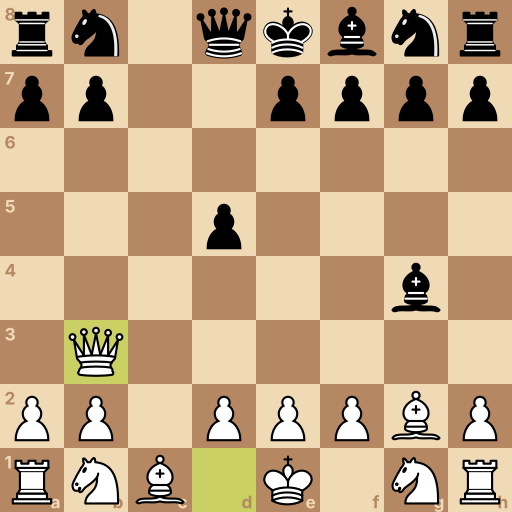
Position after 1.g4 d5 2.Bg2 Bxg4 3.c4 c6 4.cxd5 cxd5 5.Qb3. Black to move.
They take the bait — their bishop sits on g4 and their queenside is home alone.
Now the raid: hit d5, open lines, and make b7 hurt.
Your move: Push c4 and attack their d5 pawn — the raid's first knock.
3.c4 The c-pawn, two steps — it hits d5 while their bishop is away.
Your move: They guard carefully with c6. Trade: take on d5 and pull their guard forward.
4.cxd5 Take on d5 — every trade opens the g2 bishop's road further.
Your move: They recapture. Now the double knock: queen to b3, attacking b7 and leaning on d5 at the same time.
5.Qb3 The queen swings to b3 — two targets, one move.
Question: Their extra pawn sits on g4 while your queen and bishop tear at their queenside. Was the bait worth it?
Answer: Yes — their pieces defend in scramble mode while yours attack on schedule. Count who is making threats and who is answering them. b7 hangs, d5 groans, and the bishop that took your bait is a spectator on the wrong wing. The pawn bought you the initiative — the one thing in chess that compounds while your opponent reacts.
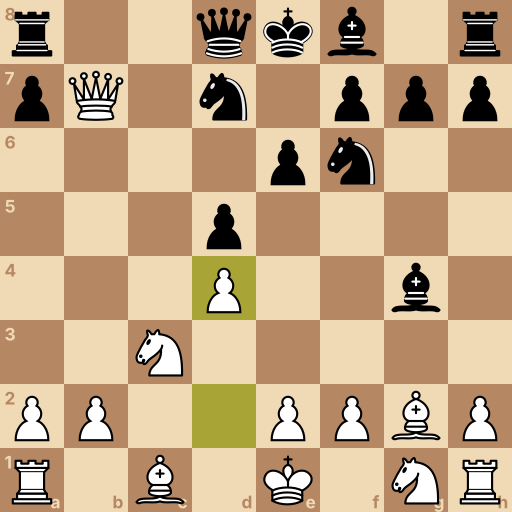
Position after 1.g4 d5 2.Bg2 Bxg4 3.c4 c6 4.cxd5 cxd5 5.Qb3 e6 6.Qxb7 Nd7 7.Nc3 Ngf6 8.d4. Black to move.
They guard d5 with the e-pawn — but nobody is left guarding b7. Collect it.
Then bring the rest of the raiders before they untangle.
Your move: Take the b7 pawn with your queen — the bait money comes back with interest, and their rook's corner is suddenly drafty.
6.Qxb7 The queen collects b7 — material even, initiative still yours.
Your move: They shore up with the knight. Bring your own: knight to c3, leaning on their d5 pawn.
7.Nc3 The knight joins and adds weight on d5.
Your move: They develop. Take the middle properly now: push d4 — your pieces raided, your pawns move in behind them.
8.d4 The d-pawn claims the middle — the raid becomes an occupation.
Question: Pawns even, their queenside creaking, your pieces active. How do you finish the job?
Answer: Bring the queen home soon, keep the pressure on d5, and convert with development. Raids end well when the raiders come home before getting trapped. The queen has done her work — one more useful move and she retreats to safety while your knight, bishop, and rook keep d5 and the c-file under pressure. Greedy queens get trapped; tidy raiders win the middlegame.
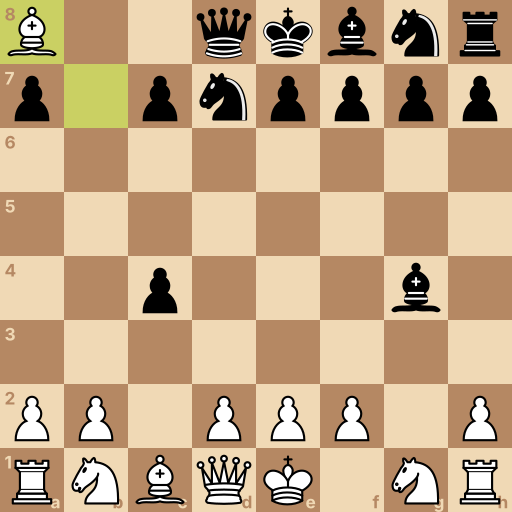
Position after 1.g4 d5 2.Bg2 Bxg4 3.c4 dxc4 4.Bxb7 Nd7 5.Bxa8. Black to move.
The greedy line: instead of guarding, they grab a second pawn with dxc4.
Look at your g2 bishop's diagonal now. It runs unblocked all the way to their rook — and the trap snaps shut.
Your move: Take the b7 pawn with your bishop — their rook has nowhere safe to go.
4.Bxb7 The bishop takes b7 and traps the corner rook in its own home.
Your move: They develop a knight — the rook has no escape square that works. Collect it: bishop takes the a8 rook.
5.Bxa8 The bishop collects the rook — two pawns given, a rook received.
Question: You gave two pawns and took a rook. What made the double grab fail?
Answer: Their second grab opened the diagonal their first grab had already weakened. Trace the g2 bishop's diagonal after each of their captures. Taking g4 sent their bishop away from b7's defense; taking c4 removed the d5 pawn that blocked the road. Two grabs, two doors opened, one rook gone. Greed against the Grob doesn't lose slowly — it loses in three moves.
Final challenge: The Glutton (800 Elo)
The opponent says: Free pawns everywhere! I'll take them all, every last one.
Your tasks in the game, in order:
Bishop to g2 — aim through the middle at b7.
Offer the second course — push c4.
They gorged — bishop takes b7, the rook is trapped.
Collect the rook on a8.
Position after 1.g4 d5 2.Bg2 Bxg4 3.c4 dxc4 4.Bxb7 Nd7 5.Bxa8. Black to move.
History of the Grob Opening
The Grob Opening begins with 1.g4 and is classified under ECO A00. It is named for Swiss player Henri Grob, who analyzed and used the move extensively during the twentieth century. Earlier examples existed, but Grob's analysis and correspondence play established the modern name around the middle of that century.
Main ideas for White
White uses 1.g4 to gain kingside space and prepare 2.Bg2, placing the bishop on the long diagonal toward b7 and a8. After 1...d5 2.Bg2 Bxg4, 3.c4 attacks d5 and can clear that diagonal. A queen on b3 may add pressure on b7 and d5, while a knight on c3 and pawn on d4 build central control. Black usually occupies the center, accepts the g-pawn, then tries to consolidate the extra material and exploit White's weakened king.
Typical plans
White usually accepts an unbalanced structure with the g-pawn missing and plays for activity before Black consolidates. The pawn break on c4 challenges Black's d5 pawn, and exchanges on d5 can open the g2-a8 diagonal and c-file. White may combine a queen on b3, knight on c3, and pawn on d4 against b7 and d5, then retreat the queen and finish development. Black seeks exchanges, king safety, and use of the extra kingside pawn.
Common mistakes
Offering the g-pawn without developing the bishop to g2 leaves no pressure for the material, so occupy the long diagonal immediately.
Grabbing b7 repeatedly with the queen can trap it, so take only when the retreat route and remaining development are secure.
Delaying king safety while chasing queenside pawns gives Black counterplay against the open g-file, so finish development after the raid.
Related openings
English Opening1.c4 e5 2.Nc3. Grip the middle from the side and squeeze.
Réti Opening1.Nf3 d5 2.c4. Press their middle without offering a target.
King's Indian Attack1.Nf3 d5 2.g3. The same house every game, then the e5 wedge.
Bird's Opening1.f4. Claim e5 from the wing and attack the king.