You claim e5 with a wing pawn on move one, land a knight on the claimed square, and attack down the file your first move opened. You play the claim, both replies, and a full game against an opponent that sets a famous trap for your f-pawn.
Start here
0
Chapter 1: The Wing Claim
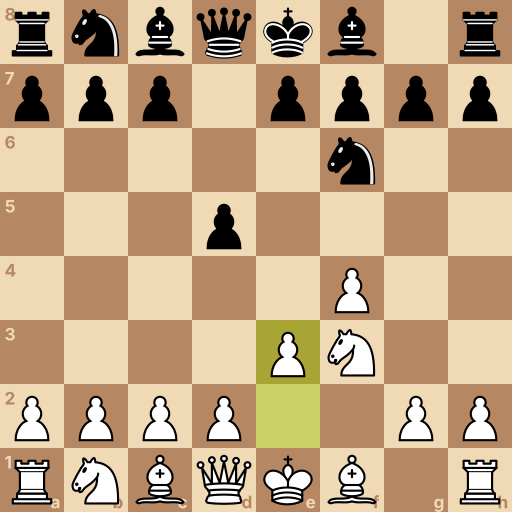
Main line: 1.f4 d5 2.Nf3 Nf6 3.e3
Position after 1.f4 d5 2.Nf3 Nf6 3.e3. Black to move.
These four squares are the middle of the board. A piece standing near them reaches everywhere; a piece stuck on the edge reaches half as far.
White moves first. This opening claims a middle square with the f-pawn — and tilts the whole game toward their king's side of the board.
Your move: Push your f-pawn two squares, to f4. It grips e5 like a middle pawn would — and points the game at their king.
1.f4 The pawn in front of your king's bishop — two steps to f4 claims e5.
Your move: They take the middle with d5. Knight to f3 — a second claim on e5.
2.Nf3 The knight beside your king's rook — one jump to f3 doubles the claim on e5.
Your move: They develop. One step with your e-pawn, to e3 — it opens the bishop and shores up the position.
3.e3 One step with the e-pawn — the bishop's door opens.
Question: This is the Dutch Defense's plan, played as White. What does the extra move mean?
Answer: Everything the Dutch promises, one move sooner — the claim, the wall, the attack. Same structure, same targets — but who reaches every milestone first? The e5 grip, the kingside lean, the coming attack — all of it arrives a move earlier than Black ever gets it. A whole plan with a head start. That is Bird's Opening.
This is Bird's Opening. The claim is doubled and the structure is starting.
Next the long battery joins from the corner, and e5 becomes a home for your knight.
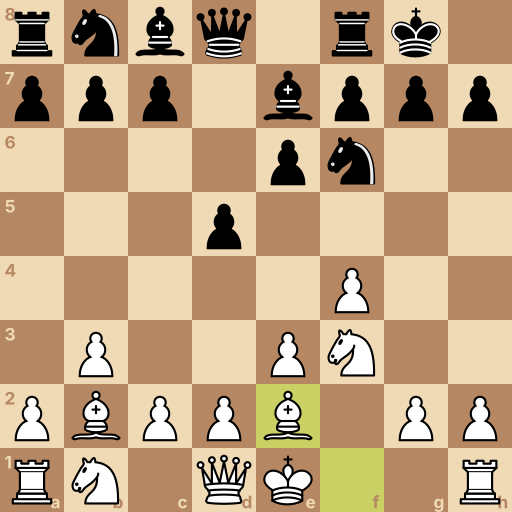
Position after 1.f4 d5 2.Nf3 Nf6 3.e3 e6 4.b3 Be7 5.Bb2 O-O 6.Be2. Black to move.
Now the piece that makes this setup sing: the queenside bishop, aimed from the corner at e5 and beyond.
Two moves put it there, and every fight on the long diagonal tilts your way afterward.
Your move: One step with your b-pawn opens the corner.
4.b3 One step with the b-pawn — the corner opens for the bishop.
Your move: They develop. Bishop to b2 — from the corner it presses e5, the square your whole opening claims.
5.Bb2 The bishop tucks into b2 and joins the fight for e5 from afar.
Your move: They castle. Your other bishop steps to e2 — modest, clearing your own castle.
6.Be2 The king's bishop steps to e2 and clears the runway.
Question: Pawn, knight, and corner bishop all press e5. What kind of square is it now?
Answer: An outpost — a piece that lands there is guarded twice and can't be pawn-kicked. Ask what happens to a knight that lands on e5 — who guards it, what chases it? Your f4 pawn guards it, the b2 bishop backs it, and their e6 pawn can never attack it. A square like that is a free home in their half of the board — and your knight moves in next chapter.
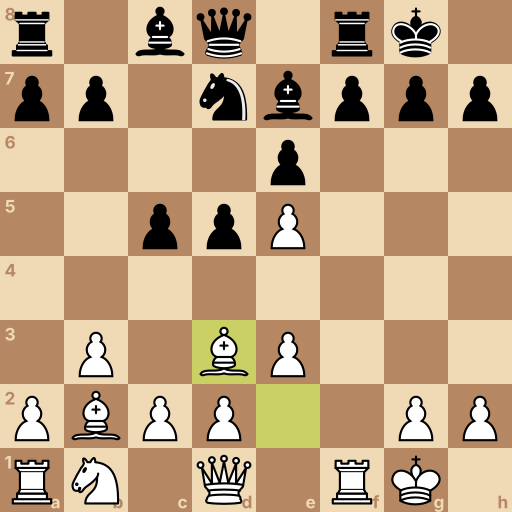
Position after 1.f4 d5 2.Nf3 Nf6 3.e3 e6 4.b3 Be7 5.Bb2 O-O 6.Be2 c5 7.O-O Nc6 8.Ne5 Nxe5 9.fxe5 Nd7 10.Bd3. Black to move.
They expand on the far side. Castle first — then the knight takes the home you built it.
Watch what happens to the f-file when the trades start on e5.
Your move: Castle — two squares toward the corner, and your rook lands behind the f-pawn.
7.O-O Two squares toward the corner — the rook lines up behind f4.
Your move: They develop. Now move in: knight to e5, the outpost your whole setup built.
8.Ne5 The knight lands on e5 — guarded, backed, and unkickable.
Your move: They trade it off — take back with the f-pawn. Two things just happened: your pawn wedge landed on e5, and your rook's file opened.
9.fxe5 The f-pawn takes back — a wedge on e5 and an open f-file in one capture.
Your move: Their knight retreats from the wedge. Point your bishop at their king: d3, eyeing h7 across the board.
10.Bd3 The bishop re-aims to d3, straight at their king's corner.
Question: Wedge on e5, open f-file, bishop at h7. Name the attack.
Answer: Queen and rook join on the f-file, and f7 or h7 gives way. Count what already points at their king, then add your queen. Rook on the open file, bishop on the h7 diagonal, wedge keeping defenders out — the queen swings to e1 or h5 and the threats stack faster than they can cover. The wing claim was aimed here all along.
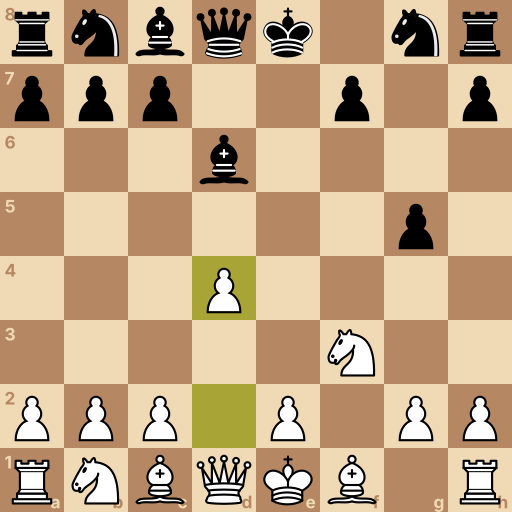
Position after 1.f4 e5 2.fxe5 d6 3.exd6 Bxd6 4.Nf3 g5 5.d4. Black to move.
The move every Bird's player must know: they gambit their e-pawn at you on move one. Take it — but know exactly what comes next.
Their plan is a fast queen check on h4. Yours is one knight jump that shuts it down forever.
Your move: Take the pawn.
2.fxe5 Your f-pawn takes the gambit pawn — accepted, eyes open.
Your move: They offer a second pawn with d6, begging you to open the h4 road. Take this one too — the trap needs one more move to spring, and you won't give it.
3.exd6 Take on d6 — stay a pawn up and stay one move ahead of the trap.
Your move: Their bishop recaptures, and the trap is loaded: Qh4 next would be a disaster for you. Defuse it now — knight to f3 covers h4 before the queen ever arrives.
4.Nf3 The knight covers h4 — the entire trap dies to this one jump.
Your move: They lunge with g5 anyway, trying to chase your knight off its guard duty. Answer in the middle: push d4 — their attack is pawns and hope, yours is a middle and a plan.
5.d4 The d-pawn takes the middle — their lunge has no army behind it.
Question: They gave a pawn and threw their g-pawn forward. What is the honest count?
Answer: You are a pawn up with the middle; their king's side is wrecked and h4 is covered. Check the h4 square, the pawn count, and what shelters their king now. The check they built everything around is impossible, the pawn is yours, and their own king has no pawn cover left. Meet the g-pawn lunge with development and the gambit collapses into a lost position. Know the trap, and the trap feeds you.
Final challenge: The Trapper (800 Elo)
The opponent says: Take the pawn. Go on. My trap only needs one more move.
Your tasks in the game, in order:
Take the gambit pawn.
They offer another — take on d6 and stay ahead of the trap.
Defuse it — knight to f3 covers h4.
They lunge — answer in the middle with d4.
Position after 1.f4 e5 2.fxe5 d6 3.exd6 Bxd6 4.Nf3 g5 5.d4. Black to move.
History of the Bird's Opening
Bird's Opening begins 1.f4 and occupies ECO codes A02 and A03. It is named after English master Henry Edward Bird, who played it regularly during the nineteenth century. The opening became established in tournament practice during the second half of that century as an independent flank opening.
Main ideas for White
White uses 1.f4 to control e5, gain kingside space, and prepare use of the f-file after exchanges. Nf3 and e3 support the center, while b3 and Bb2 place the dark-squared bishop on the long diagonal toward e5 and h8. White often seeks a knight outpost on e5 and develops the other bishop toward d3. Black usually occupies d5, develops with Nf6 and e6, and may challenge White immediately with the From Gambit 1...e5.
Typical plans
Bird structures often resemble a Dutch Defense with colors reversed, with White pawns on f4 and e3 against Black pawns on d5 and e6. White castles kingside, places the knight on e5, and may recapture there with the f-pawn to open the f-file and create play with Bd3 and Qe1 or Qh5. Black seeks queenside activity with c5 and Nc6 or central play with d4. White's usual pawn breaks are e4 and f5 when development permits them.
Common mistakes
Do not play 1.f4 and ignore king safety; develop Nf3 and castle before committing more pawns near the king.
Do not occupy e5 with the knight before the square is supported; prepare Nf3, e3, b3, and Bb2 before moving in.
In the From Gambit, do not allow Qh4 mate threats; play Nf3 before Black's queen can use the weakened diagonal.
Related openings
English Opening1.c4 e5 2.Nc3. Grip the middle from the side and squeeze.
Réti Opening1.Nf3 d5 2.c4. Press their middle without offering a target.
King's Indian Attack1.Nf3 d5 2.g3. The same house every game, then the e5 wedge.