Two natural moves, then d4 breaks the middle open before they are ready. You play the strike, both replies, and a full game against an opponent that pokes your knight with everything they have.
Start here
0
Chapter 1: The Strike
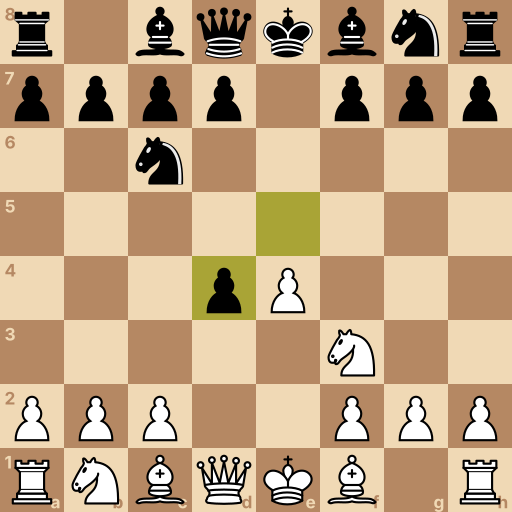
Main line: 1.e4 e5 2.Nf3 Nc6 3.d4 exd4
Position after 1.e4 e5 2.Nf3 Nc6 3.d4 exd4. White to move.
These four squares are the middle of the board. A piece standing near them reaches everywhere; a piece stuck on the edge reaches half as far.
White moves first. This opening claims one middle square, then blows the middle open two moves later.
Your move: Push the pawn in front of your king two squares, to e4, and take your first middle square.
1.e4 The pawn in front of your king — two steps to e4 grabs the middle.
Your move: They answer with e5, and the two pawns block each other. Bring your kingside knight to f3 — it attacks their e5 pawn straight away.
2.Nf3 The knight beside your king's rook — one jump to f3 hits e5.
Your move: They guard the pawn with their knight. Now the Scotch move: push your queen's pawn two squares, to d4, and hit e5 a second time.
3.d4 The queen's pawn, two steps — two of your men now attack e5.
Question: e5 is attacked twice and guarded once. What must they do?
Answer: Take on d4 — and their middle pawn leaves the middle. Anything that leaves e5 standing loses it — count the attackers again. Guarding again or ignoring it just drops the pawn. So they take on d4 — and the pawn that held their middle is gone from it. That trade is the whole point of the Scotch.
This is the Scotch Game. Three moves in, the middle is open and their middle pawn is off the board.
Two of your pieces can take back on d4. The next chapter shows why it must be the knight — never the queen.
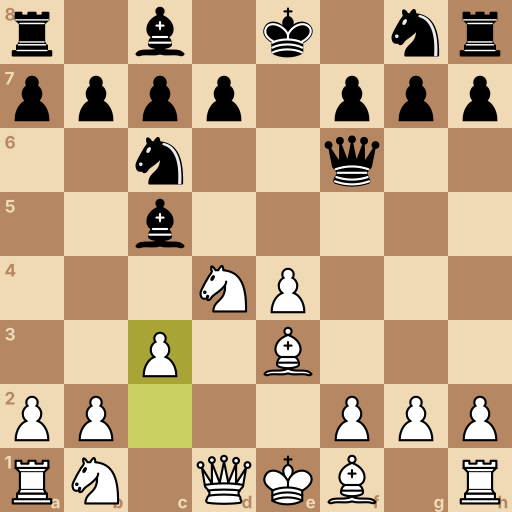
Position after 1.e4 e5 2.Nf3 Nc6 3.d4 exd4 4.Nxd4 Bc5 5.Be3 Qf6 6.c3. Black to move.
Their pawn sits on d4, and your queen or your knight can take it. The queen looks natural.
Look at their c6 knight first — it is already aimed at d4, waiting for her.
Question: Queen takes or knight takes — which, and why?
Answer: Knight — the queen would be attacked the moment she lands. What already attacks d4 besides your own two pieces? Take with the queen and their c6 knight hits her at once — she runs, and a whole move is handed back. The knight lands on d4 guarded by your queen and stays.
Your move: Take back with the knight. It sits in the middle of the board, guarded by your queen behind it.
4.Nxd4 The f3 knight takes the pawn — it lands guarded, the queen would not.
Your move: Their bishop comes to c5 and stares at your knight, and at f2 behind it. Answer with your own bishop to e3 — it guards the knight and blocks the stare.
5.Be3 Your dark bishop to e3 meets theirs head on and guards d4.
Your move: Their queen joins in from f6 — a third poke at your knight. One small step, c3, gives it one more guard and asks: anything else?
6.c3 One step with the c-pawn puts another guard on d4.
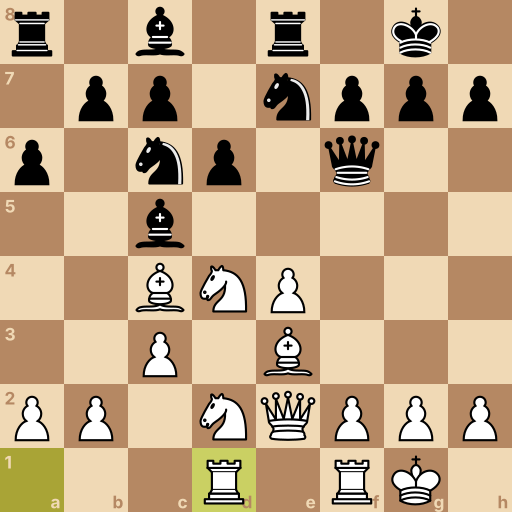
Position after 1.e4 e5 2.Nf3 Nc6 3.d4 exd4 4.Nxd4 Bc5 5.Be3 Qf6 6.c3 Nge7 7.Bc4 O-O 8.O-O d6 9.Nd2 Re8 10.Qe2 a6 11.Rad1. Black to move.
Your d4 knight is settled — poked three times, guarded three times, going nowhere.
Now ordinary work: the other pieces out, the king safe, and the rooks to the middle.
Your move: They bring their other knight to e7. Slide your bishop to c4 — the diagonal to f7 is open, and only their king guards that square.
7.Bc4 The king's bishop, out to c4 — the road to f7 is open.
Your move: They castle. Castle too — king two squares toward the corner, safe.
8.O-O Two squares toward the corner — the rook jumps over by itself.
Your move: They prop with d6. Your last knight has one road out — d2, since your own pawn took c3. Bring it out.
9.Nd2 The queenside knight steps to d2 — c3 is taken by your own pawn.
Your move: Their rook slides to the middle file. Step your queen up to e2 — she keeps an eye on e4 and clears d1 for your own rook.
10.Qe2 The queen steps one square to e2 and hands d1 to the rook.
Your move: They wait with a small pawn move. Put your queen's rook on d1 — the open middle file, right behind your knight.
11.Rad1 The rook in the far corner slides to d1, onto the open middle file.
Question: Everything is out and the king is safe. What is the plan?
Answer: Squeeze — the rook, the anchored knight, and the f7 bishop keep the pressure on. You own more of the middle than they do — keep it that way. The Scotch gives you the middle and the freer pieces. Keep the knight anchored, keep the bishop on f7's diagonal, and improve one piece at a time — their position has no easy plan against that.
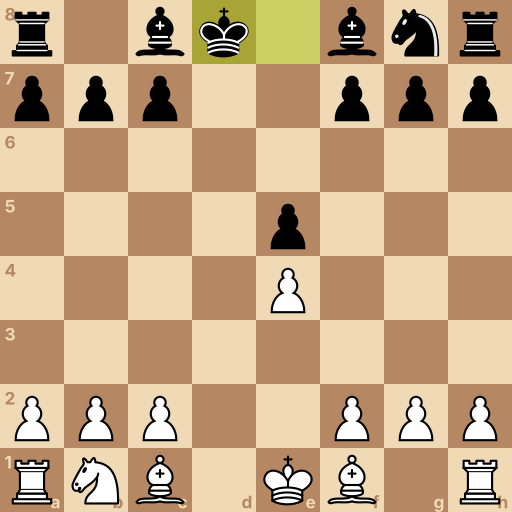
Position after 1.e4 e5 2.Nf3 Nc6 3.d4 d6 4.dxe5 Nxe5 5.Nxe5 dxe5 6.Qxd8+ Kxd8. White to move.
Sometimes they refuse the trade and prop e5 with a small pawn instead. Now e5 is guarded twice — and attacked twice.
When you can take first, props like this fall apart one capture at a time.
Your move: Take the e5 pawn with your d-pawn.
4.dxe5 Your d4 pawn takes e5 — you capture first.
Your move: Their knight takes back. Take it with yours — and notice the d-file starting to open behind the trades.
5.Nxe5 Your knight takes theirs on e5 — keep the trades coming.
Your move: Their d-pawn takes your knight — and opens its own king's file. Take their queen, with check.
6.Qxd8+ The d-file is wide open — your queen takes theirs on d8.
Question: Their king had to take back — castling is gone for the rest of the game. What is your plan?
Answer: Develop, castle, and point your rooks at the middle. One king can still reach a corner and one can't — build toward that. No queens on the board, but the game is uneven anyway: your king will castle to safety and theirs stands in the open. Pieces out, castle, rooks to the middle files — the stuck king waits.
Final challenge: The Pest (800 Elo)
The opponent says: Nice knight you'll have there. I'm going to poke it all game.
Your tasks in the game, in order:
Take back with the knight, never the queen.
Their bishop stares — meet it with your bishop on e3.
Their queen joins in — give the knight one more guard with c3.
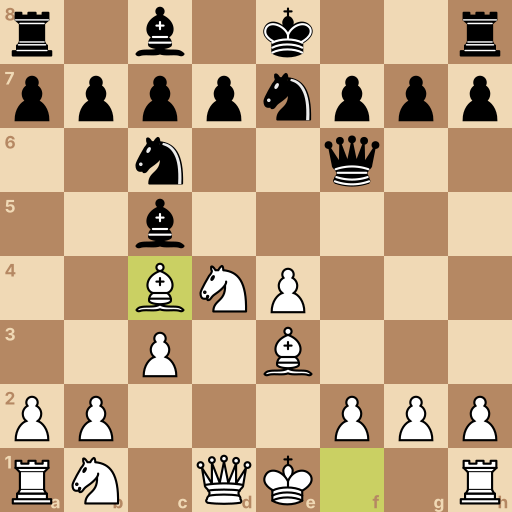
No pokes left. Point your bishop at f7 — out to c4.
Position after 1.e4 e5 2.Nf3 Nc6 3.d4 exd4 4.Nxd4 Bc5 5.Be3 Qf6 6.c3 Nge7 7.Bc4. Black to move.
History of the Scotch Game
The Scotch Game begins 1.e4 e5 2.Nf3 Nc6 3.d4 and is classified mainly under ECO C44 and C45. Its name comes from an 1824 correspondence match between Edinburgh and London in which the Scottish side used the opening. It became an established open-game choice during the nineteenth century.
Main ideas for White
White challenges e5 immediately with 3.d4, asking Black to release the center before completing development. After 3...exd4, Nxd4 recaptures with development and places the knight on a central square, while Qxd4 would expose the queen to Nc6. The bishops often develop to e3 and c4, supporting d4 and looking toward f7. Black usually attacks the d4 knight with Bc5 and Qf6 while preparing development and castling.
Typical plans
The early exchange removes White's d-pawn and Black's e-pawn, producing an open center with White's e4 pawn and active piece play. White can support the d4 knight with Be3 and c3, place a rook on d1, and keep the c4 bishop aimed at f7. Black seeks pressure on d4 and the freeing d5 break. White may gain space with e5 or prepare f4 when development and king safety permit.
Common mistakes
Do not recapture on d4 with the queen when Nc6 attacks it; use Nxd4 and gain a centralized developed piece.
Do not defend the d4 knight with repeated queen moves; develop Be3 and use c3 when additional support is needed.
Do not delay castling in the open center; develop the bishops, secure the king, and then place rooks on central files.
Related openings
Italian Game1.e4 e5 2.Nf3 Nc6 3.Bc4. Fast pieces, and a bishop aimed straight at f7.
Ruy Lopez1.e4 e5 2.Nf3 Nc6 3.Bb5. Lean on the one knight holding up their middle.
Vienna Game1.e4 e5 2.Nc3. Knight out first, f-pawn free to charge.
King's Gambit1.e4 e5 2.f4. Spend a pawn, own the middle and an open file.
Caro-Kann Defense1.e4 c6. Answer 1.e4 with a middle pawn that arrives guarded.
French Defense1.e4 e6. One pawn guards, the next one strikes the middle.