Your queen's pawn attacks their e4 pawn on move one, and when they take, your queen takes back. You play the counter, both replies, and a full game against an opponent that hunts your queen.
Start here
0
Chapter 1: The First Strike
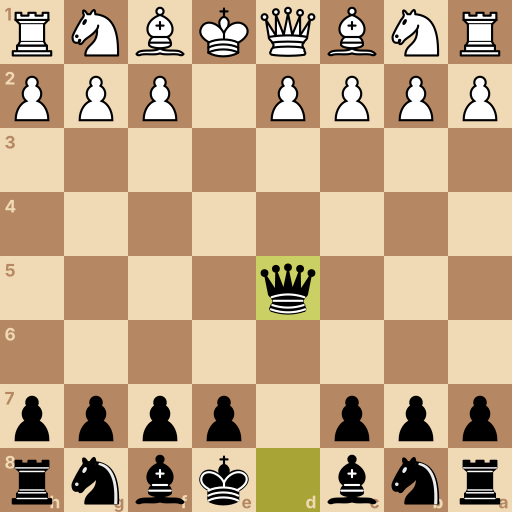
Main line: 1.e4 d5 2.exd5 Qxd5
Position after 1.e4 d5 2.exd5 Qxd5. White to move.
These four squares are the middle of the board. A piece standing near them reaches everywhere; a piece stuck on the edge reaches half as far.
White moves first and will claim one of them. Most defenses answer slowly. This one answers with a punch.
1.e4 — their pawn lands in the middle and opens lines for their queen and bishop.
The Scandinavian does not prepare, does not wait. It attacks that pawn on the very first move.
Your move: Push your queen's pawn two squares, to d5. It attacks their e4 pawn straight away — move one, and they already have a problem.
1...d5 The pawn in front of your queen — two steps to d5 hits their pawn head on.
Your move: They take your pawn. Take back with your queen — she comes out early on purpose here, and stands in the middle of the board.
2...Qxd5 Your queen sits right behind that pawn — take back with her.
Question: Everyone says don't bring your queen out early. Why is it fine here?
Answer: Only one of their moves attacks her, and she has a safe square ready. Count the ways they can hit that queen next move. The early queen costs something only when she gets chased around. Here just one developing move attacks her — the knight to c3 — and she has her answer prepared. That is the next chapter.
This is the Scandinavian Defense. One move in, their middle pawn is gone and the pawn count is even.
Their best try is the knight jump to c3, hitting your queen. You will learn that first, then what to do when they refuse to take at all.
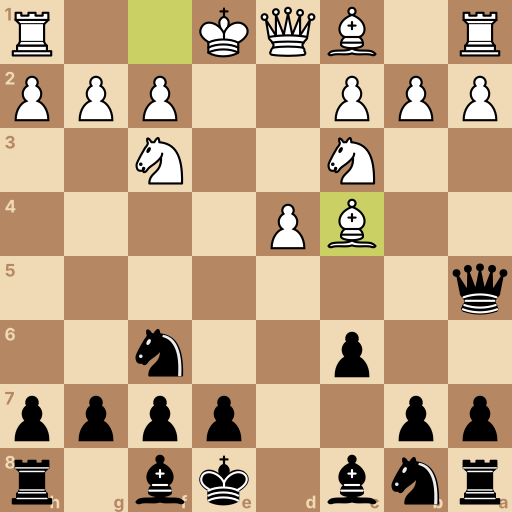
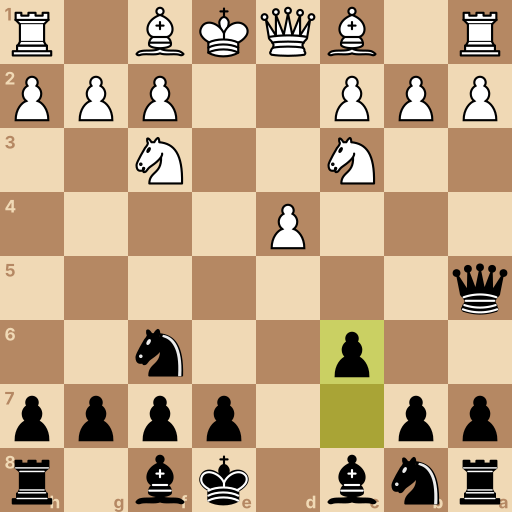
Position after 1.e4 d5 2.exd5 Qxd5 3.Nc3 Qa5 4.d4 Nf6 5.Nf3 c6 6.Bc4. Black to move.
There it is: the knight comes out and attacks your queen. This is the one move you had to be ready for.
She needs a square that is safe, stays active, and never has to move again. There is exactly one.
Your move: Slide your queen along the rank to a5. No piece reaches her there, and she stares down the long diagonal toward their king.
3...Qa5 Slide her sideways to a5 — nothing of theirs can touch that square.
Your move: They push d4 — and notice what just happened: their c3 knight now stands between your queen and their king, so it cannot move. Bring your kingside knight to f6.
4...Nf6 The knight in front of your rook — one jump to f6, toward the middle.
Your move: They develop the other knight. Play the quiet pawn move to c6 — it takes b5 and d5 away from their knights and opens a road home for your queen.
5...c6 One small step with the c-pawn — it guards the squares their knight wants.
Question: Why spend a move on the little c6 pawn?
Answer: It shuts their knights out of b5 and d5. Look at the two squares their c3 knight was eyeing. Knight jumps to b5 or d5 were the only ways to bother your queen again. One pawn move ends both forever — and gives her a quiet road home through c7 if she ever wants one.
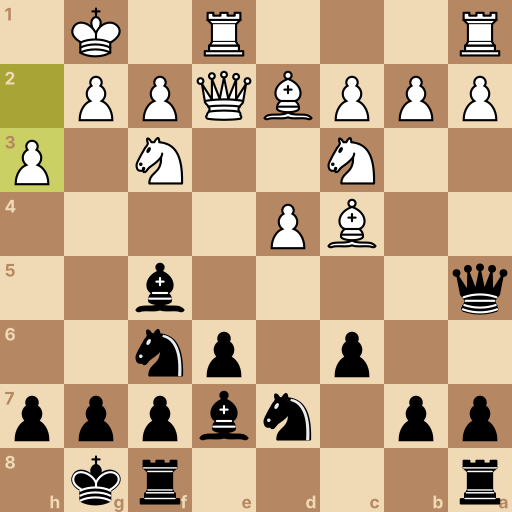
Position after 1.e4 d5 2.exd5 Qxd5 3.Nc3 Qa5 4.d4 Nf6 5.Nf3 c6 6.Bc4 Bf5 7.Bd2 e6 8.Qe2 Nbd7 9.O-O Be7 10.Rfe1 O-O 11.h3. Black to move.
The queen question is settled. From here the Scandinavian is simple work: every piece gets a seat, then the king castles.
One rule orders the moves — the bishop on c8 leaves home before the e-pawn locks it in.
Your move: Slide that bishop out to f5, onto the open diagonal, while the door is still open.
6...Bf5 The bishop beside your queen goes first — f5, before a pawn shuts its door.
Your move: They tuck their bishop onto d2, behind the pinned knight. Now the small step to e6 is free — it opens your other bishop and builds a wall in front of your king.
7...e6 One step with the e-pawn — your light bishop is already outside, so nothing gets shut in.
Your move: Their queen steps up. Bring your queenside knight to d7 — it guards the middle and stands behind the e5 break you will play later.
8...Nbd7 The knight beside your rook goes to d7, tucked behind your pawns.
Your move: They castle. Bring your dark bishop to e7 — the last piece between your king and its corner.
9...Be7 The bishop on f8 steps to e7 and clears the runway for your king.
Your move: Their rook comes to the middle. Castle — king two squares toward the corner, done.
10...O-O Two squares toward the corner — the rook jumps over by itself.
Question: Everything is placed and the king is safe. Where does your play come from?
Answer: Time the e5 break in the middle. Your d7 knight and e6 pawn are both pointed at the same square. The e-pawn steps to e5 with the knight behind it, and the middle opens while your pieces already sit on their best squares. Until that moment, you are solid everywhere and nothing hangs.
Chapter 4: The Refusal
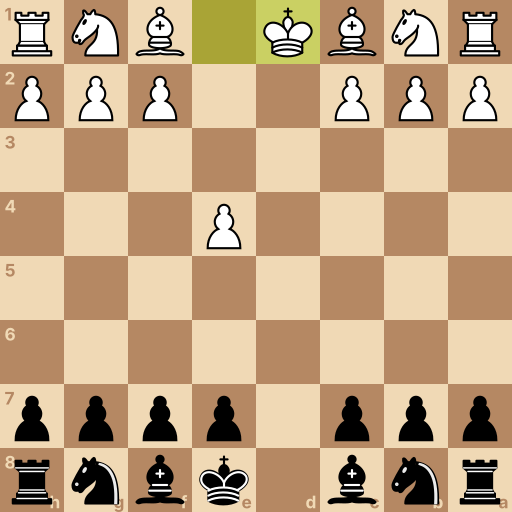
Main line: 1.e4 d5 2.d3 dxe4 3.dxe4 Qxd1+ 4.Kxd1
Position after 1.e4 d5 2.d3 dxe4 3.dxe4 Qxd1+ 4.Kxd1. Black to move.
Sometimes they refuse the trade and prop up e4 with a small pawn instead. It looks solid. It has a cost they didn't see.
Watch what happens on the d-file when the pawns come off.
Your move: Take their e4 pawn with yours.
2...dxe4 Your d5 pawn takes the pawn it has been attacking all along.
Your move: They take back with the d-pawn — and now both queens stand on an open file, facing each other. Take theirs, with check.
3...Qxd1+ The d-file is wide open — your queen takes theirs on d1.
Question: Their king had to take back, and castling is gone for the rest of the game. What is your plan now?
Answer: Develop, castle, and point your rooks at the middle. One king can hide in a corner and one can't — build toward that, don't rush it. No queens on the board, but the game is uneven anyway: you will castle and their king stays in the open. Bring the pieces out, castle, and let your rooks stare down the middle files at him.
Final challenge: The Chaser (800 Elo)
The opponent says: Bring that queen out. I'll chase her all game long.
Your tasks in the game, in order:
Take their pawn back with your queen.
The knight attacks her — slide her to the safe square, a5.
Bring your kingside knight to f6.
Play the quiet c6 — no more knight jumps, and a road home for the queen.
Position after 1.e4 d5 2.exd5 Qxd5 3.Nc3 Qa5 4.d4 Nf6 5.Nf3 c6. White to move.
History of the Scandinavian Defense
The Scandinavian Defense begins with 1.e4 d5 and is classified as ECO B01. It was formerly widely called the Center Counter Defense because Black counters the e4 pawn immediately. The modern name reflects analysis and use by Scandinavian players in the late nineteenth century, when the opening began to acquire an established body of theory.
Main ideas for Black
Black uses 1...d5 to attack e4 before making another developing move. After 2.exd5 Qxd5 3.Nc3, 3...Qa5 keeps the queen active on the a5-e1 diagonal while avoiding another gain of tempo, and the c6 pawn controls b5 and d5. The light-squared bishop should often reach f5 before the e6 pawn blocks its c8 diagonal. White usually develops quickly in the center and aims to use the queen move to gain time.
Typical plans
Black aims for a compact structure with pawns on c6 and e6, queen on a5, knights on f6 and d7, and the light-squared bishop outside the pawn chain on f5. After castling, the pawn break on e5 is the main source of activity and can challenge White's pawn center. White normally uses easier development and more central space for the initiative. Black should complete development, contest central files, and retreat the queen through c7 if pressure makes that necessary.
Common mistakes
Leaving the queen on d5 after 3.Nc3 ignores a direct attack, so move her to a5 before continuing development.
Advancing the e6 pawn before developing the c8 bishop restricts it, so place the bishop on f5 first when possible.
Starting the e5 pawn break before castling can expose the king in an opening center, so complete development before changing the structure.
Related openings
Caro-Kann Defense1.e4 c6. Answer 1.e4 with a middle pawn that arrives guarded.
French Defense1.e4 e6. One pawn guards, the next one strikes the middle.
Sicilian Defense1.e4 c5. Fight for the middle from the side, never the mirror.
Pirc Defense1.e4 d6 2.d4 Nf6. Let them build the middle, then hit the building.