Two quiet pawn moves — c6 then d5 — give you a middle pawn that arrives with its guard already in place. You play the setup, both replies, and a full game against an opponent that pushes past your pawn.
Start here
0
Chapter 1: The Calm Answer
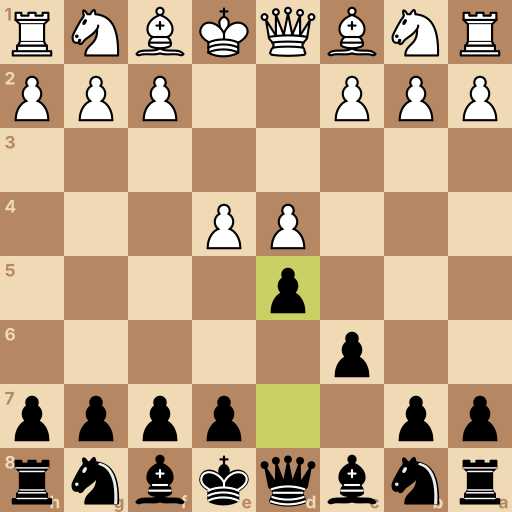
Main line: 1.e4 c6 2.d4 d5
Position after 1.e4 c6 2.d4 d5. White to move.
A piece in the middle can reach the whole board in a move or two, and a piece on the edge can't. Both players want these four squares.
White moves first, so they will grab one before you can. Your opening is about answering that grab without giving anything away.
There it is: 1.e4, the most common first move in chess. Their pawn takes a middle square and opens lines for their queen and bishop.
You could mirror it and let the fights start at once. The Caro-Kann answers more calmly: get a guard ready first, then claim your own middle square.
Your move: Push the pawn in front of your queenside knight one square, to c6. Its one job: guard the d5 square before your pawn lands there.
1...c6 Try the pawn beside your queen's pawn — one step to c6 gets the guard in place.
Your move: They grab the other middle square with d4. Now push your queen's pawn two squares to d5 — it lands already guarded, and it attacks their e4 pawn.
2...d5 Now the big step — two squares to d5, right into the guarded spot.
Question: Your d5 pawn attacks their e4 pawn. Why is that safe for you?
Answer: If they take, the c6 pawn takes back. Look at who guards d5 the moment their pawn takes it. If they take on d5, your c-pawn recaptures and you keep a pawn in the middle. That trade is the next chapter.
This is the Caro-Kann. Two quiet pawn moves, and their e4 pawn already has a question to answer.
They can take your pawn, or push past it to e5. You will learn both, starting with the take.
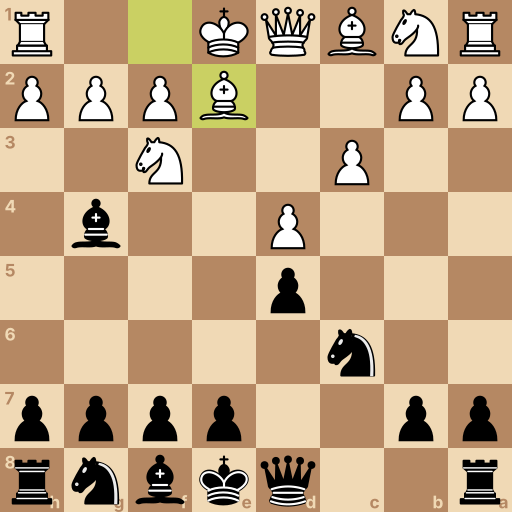
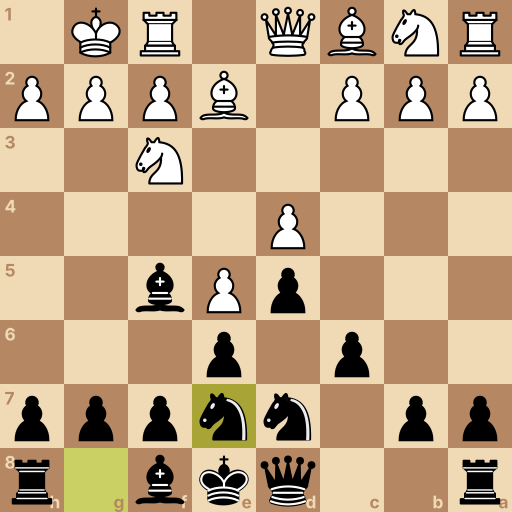
Position after 1.e4 c6 2.d4 d5 3.exd5 cxd5 4.Nf3 Nc6 5.c3 Bg4 6.Be2. Black to move.
The most common answer: their e-pawn takes yours on d5. Nothing bad happened — this is exactly the trade your c6 pawn was placed for.
Your move: Take their pawn on d5 with your c-pawn, toward the middle. You keep a pawn there, and your c8-bishop's diagonal stays open.
3...cxd5 Take back with the c-pawn — capturing toward the middle keeps a pawn there.
Your move: They bring a knight to f3. Answer with your queenside knight to c6, where it watches the middle and leans on their d4 pawn.
4...Nc6 Bring the knight beside your rook to c6 — it leans straight on d4.
Your move: They prop up d4 with a small pawn move. Slide your bishop out to g4 and pin their knight — if it moves, the queen behind it hangs.
5...Bg4 Slide your bishop to g4 — it pins that knight to the queen.
Question: So what is the plan after the trade?
Answer: Pieces out, castle, keep the d5 pawn solid. No chases and no pawn storms — finish your pieces and castle. The pawns are level and nothing is hanging. The side that finishes development first is the one who gets to ask the questions.
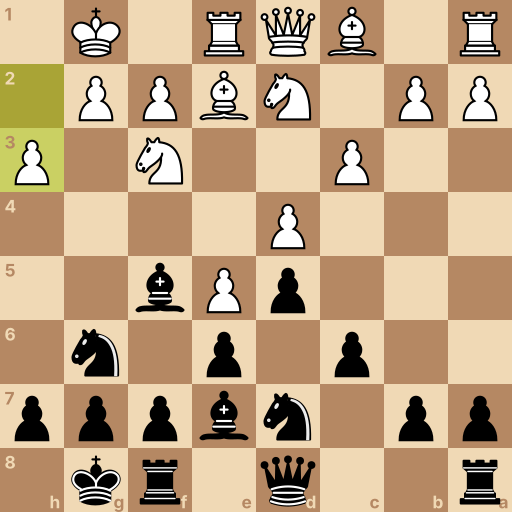
Position after 1.e4 c6 2.d4 d5 3.e5 Bf5 4.Nf3 e6 5.Be2 Nd7 6.O-O Ne7 7.c3 Ng6 8.Re1 Be7 9.Nbd2 O-O 10.h3. Black to move.
Instead of taking, they push past. The middle locks, and their e5 pawn takes the f6 square away from your knight.
One job comes before everything else here: your c8-bishop leaves home before the door closes behind it.
Your move: Slide your bishop out to f5, outside the pawn chain, while its diagonal is still open.
3...Bf5 The bishop goes first — once a pawn lands on e6, its door shuts for the whole game.
Your move: They develop a knight. Now pawn to e6 is safe: it locks your chain and opens your f8-bishop, and your other bishop is already outside.
4...e6 One small step to e6 — the outside bishop makes it safe now.
Your move: Their bishop steps out. Bring your queenside knight to d7, where it stands behind the c5 break you will play later.
5...Nd7 The knight beside your rook goes to d7 — it backs up the c5 break to come.
Your move: They castle. Your kingside knight can't use f6 — their pawn owns it — so step it out to e7, on its way to g6 or f5.
6...Ne7 f6 belongs to their pawn — take the sideways door through e7.
Your move: They shore up d4. Hop the knight on to g6, where it eyes their e5 pawn and clears the path for your dark bishop.
7...Ng6 One more hop, to g6 — the knight watches e5 from there.
Your move: Their rook slides to the middle. Bring your dark bishop to e7 — the last piece between your king and castling.
8...Be7 The dark bishop to e7 — it clears the way for your king.
Your move: Everything is placed. Castle — slide your king two squares toward the corner.
9...O-O Time to castle — two squares toward the corner.
Question: The middle is locked. So where does your play come from?
Answer: Break the chain at its base with c5. The chain hangs from d4 — hit that base with your c-pawn. Pawn to c5 hits d4, the bottom of their chain, with your d7 knight ready to take back. Trades there open the c-file for your rooks, and if d4 ever falls, the chain falls with it.
Chapter 4: The Quiet Setup
Main line: 1.e4 c6 2.d3 d5 3.Nd2 e5 4.Ngf3
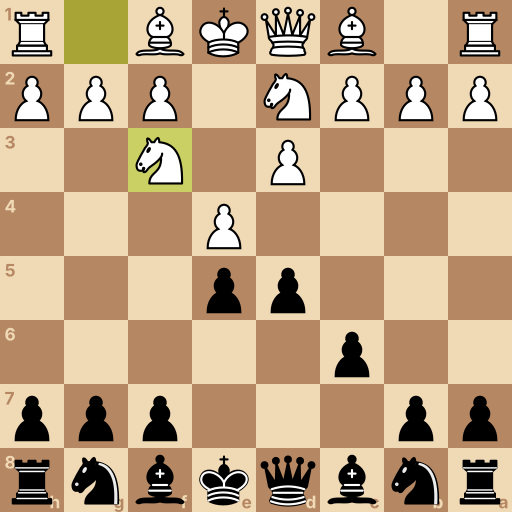
Position after 1.e4 c6 2.d3 d5 3.Nd2 e5 4.Ngf3. Black to move.
Sometimes they skip the second middle square and tuck a pawn on d3 instead. Nothing to attack — but nothing claimed, either.
When they play small, you play big: take the middle they left open.
Your move: Plant your pawn on d5 with its guard already on c6. You now hold as much of the middle as they do.
2...d5 Same move as always — two squares to d5, into the guarded spot.
Your move: Their knight tucks in behind the pawns. Push your e-pawn two squares to e5 — two pawns side by side, the middle they refused.
3...e5 Go big — two squares to e5 puts your pawns side by side in the middle.
Question: You own the middle for once. What now?
Answer: Develop behind your two pawns and castle. Keep the pair standing — develop behind them and castle. Your two pawns cramp them the way e4 and d4 usually cramp you. Pieces out behind the pair, castle, and push a pawn only when it is chased.
Final challenge: The Steamroller (800 Elo)
The opponent says: I push through the middle. Your board is about to get small.
Your tasks in the game, in order:
Get your bishop out to f5 before the chain shuts it in.
Lock the chain with pawn to e6 — your bishop is already outside.
Bring your queenside knight to d7, behind the c5 break.
Step your kingside knight out to e7 — f6 belongs to their pawn.
Position after 1.e4 c6 2.d4 d5 3.e5 Bf5 4.Nf3 e6 5.Be2 Nd7 6.O-O Ne7. White to move.
History of the Caro-Kann Defense
The Caro-Kann Defense begins with 1.e4 c6 2.d4 d5 and occupies ECO codes B10 through B19. It is named after English-born player Horatio Caro and Austrian player Marcus Kann. Their analysis and practical use helped establish the opening in the late nineteenth century, and it later became a regular defense at master level.
Main ideas for Black
Black plays 1...c6 to support 2...d5, challenging e4 without blocking the bishop on c8. If White chooses 3.exd5, 3...cxd5 leaves a sound central pawn on d5. After the Advance 3.e5, the c8 bishop often develops with 3...Bf5 before the e6 pawn advances, while the knights use d7, e7, and g6. White usually uses the space advantage to support d4 and e5, then seeks kingside activity.
Typical plans
In Exchange structures, Black develops the queenside knight on c6 and bishop on g4, castles, and pressures d4 while keeping d5 stable. In Advance structures, the pawn chain runs from e6 through d5 against White pawns on d4 and e5, and Black attacks its base with the c5 break. The c-file often opens after exchanges, giving the rooks activity. White plays for space and kingside initiative, while Black develops compactly and also considers the f6 break.
Common mistakes
Recapturing on d5 with the wrong pawn spoils the intended structure, so answer 3.exd5 with 3...cxd5 and preserve central control.
Blocking the c8 bishop with the e6 pawn too soon makes it passive, so answer 3.e5 with 3...Bf5.
Playing 3...Nf6 after 3.e5 puts the knight on a square the e5 pawn attacks and loses it to 4.exf6, so develop the knight through e7 instead.
Related openings
French Defense1.e4 e6. One pawn guards, the next one strikes the middle.