You dangle your knight in front of their pawns, let them chase it across the board, and then bite the overstretched pawns one by one. You play the bait, both replies, and a full game against an opponent that chases with everything.
Start here
0
Chapter 1: The Bait
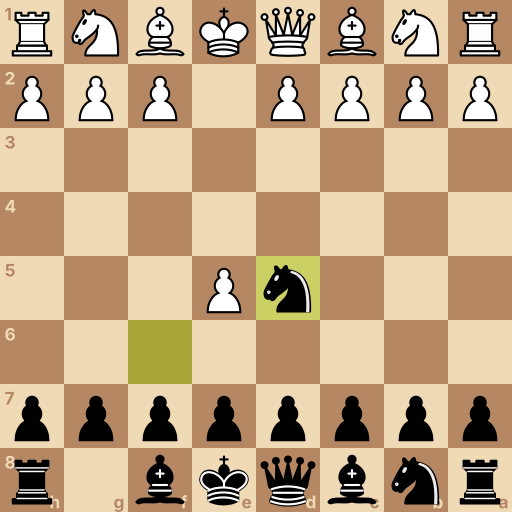
Main line: 1.e4 Nf6 2.e5 Nd5
Position after 1.e4 Nf6 2.e5 Nd5. White to move.
These four squares are the middle of the board. A piece standing near them reaches everywhere; a piece stuck on the edge reaches half as far.
White moves first and takes a middle square. Most defenses hold their ground. This one offers a target — on purpose.
Your move: They open with 1.e4. Jump your knight straight to f6, attacking that pawn — and daring it to chase you.
1...Nf6 The knight in front of your rook — one jump to f6 attacks e4 and offers the bait.
They take the bait — the pawn charges forward and attacks your knight.
Good. Every pawn that runs up the board leaves the squares behind it undefended, and needs a guard for the rest of the game.
Your move: Step the knight to d5 — the middle of the board. Getting chased there is no punishment at all.
2...Nd5 The chased knight hops to d5, right in the middle.
Question: Why invite the chase at all?
Answer: Chased pawns become advanced pawns — and advanced pawns become targets. Think about who has to guard that e5 pawn for the rest of the game. Their pawn stands proud on e5 — and it can never go home. Every pawn they push chasing you is one more thing to defend. Your whole opening is a plan to make them overextend, then bite. That is the Alekhine.
This is Alekhine's Defense. One knight out, their pawn already committed.
Usually they keep coming — d4 and c4 next. The next chapter shows where the knight goes, and where the biting starts.
Chapter 2: The First Bite
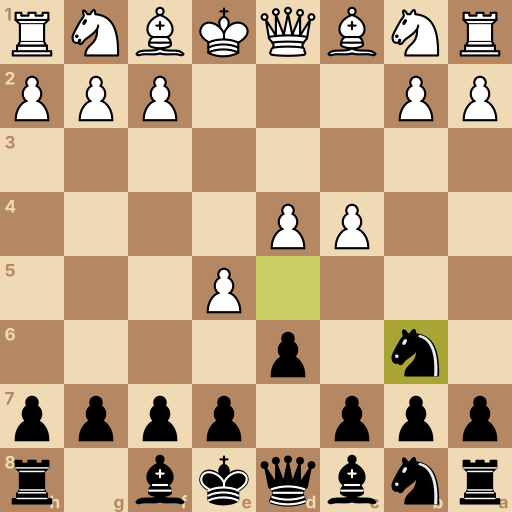
Main line: 1.e4 Nf6 2.e5 Nd5 3.d4 d6 4.c4 Nb6
Position after 1.e4 Nf6 2.e5 Nd5 3.d4 d6 4.c4 Nb6. White to move.
A second pawn joins the parade. Now the biting starts — quietly.
One small pawn move attacks the proudest pawn they have.
Your move: Play d6, one step. It attacks their e5 pawn — the first bite at the overstretched chain.
3...d6 One step with the d-pawn — it attacks the pawn that chased your knight.
Your move: They chase your knight again with c4. Step it to b6 — out of reach, and leaning on that new c4 pawn.
4...Nb6 The knight steps to b6 — safe, and watching the c4 pawn they just pushed.
Question: Three of their pawns are past the middle line and your knight keeps hopping. Who is winning this exchange?
Answer: You — they have three pawns to babysit and no pieces out. Count their developed pieces, then count their pawns that need guards. Zero pieces developed, three pawns committed. Space only counts when pieces stand behind it — and theirs are all still at home. Your d6 bite is already forcing decisions.
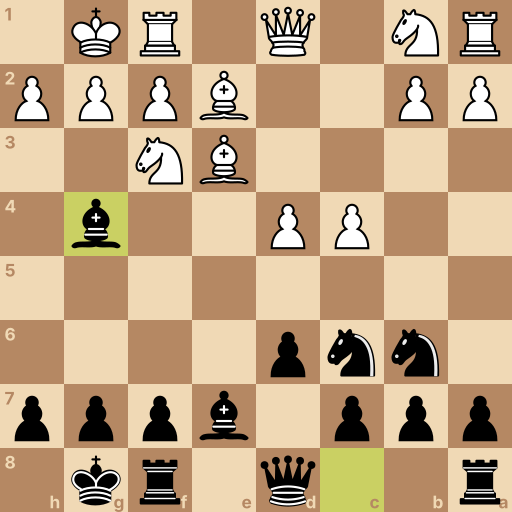
Position after 1.e4 Nf6 2.e5 Nd5 3.d4 d6 4.c4 Nb6 5.exd6 exd6 6.Nf3 Be7 7.Be2 O-O 8.O-O Nc6 9.Be3 Bg4. White to move.
They resolve the tension and trade on d6. Take back with the e-pawn — it opens the road for your king's bishop and keeps your pawns healthy.
From here it is honest work: develop, castle, and lean on the d4 pawn their charge left behind.
Your move: Take back with your e-pawn.
5...exd6 The e-pawn takes back on d6 and opens your bishop's road.
Your move: They develop a knight. Your bishop steps to e7 — modest, solid, clearing the castle.
6...Be7 The bishop on f8 steps to e7 and clears the runway for your king.
Your move: They develop again. Castle — two squares toward the corner, done.
7...O-O Two squares toward the corner — the rook jumps over by itself.
Your move: They castle too. Bring your knight to c6 — it attacks the d4 pawn, the one their early charge left short of guards.
8...Nc6 The knight beside your rook jumps to c6 and hits d4.
Your move: They prop d4 with the bishop. Add pressure sideways: your bishop to g4 pins the f3 knight — one of d4's guards can no longer do its job.
9...Bg4 The bishop pins the f3 knight — a guard that cannot move guards nothing.
Question: Everything is out and their middle is under siege. What is the long plan?
Answer: Keep leaning on d4 until a guard runs out. Their advanced pawns can't guard each other — count attackers and guards on d4. The pawns they pushed in the opening need pieces to guard them for the whole game — pieces that would rather do anything else. Keep adding attackers, and eventually a pawn falls or a guard abandons something worse. The bait pays off slowly, then all at once.
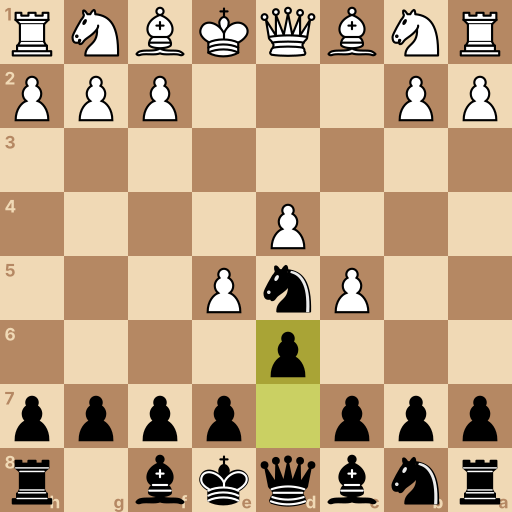
Position after 1.e4 Nf6 2.e5 Nd5 3.c4 Nb6 4.c5 Nd5 5.d4 d6. White to move.
Some opponents can't stop chasing. Here comes c4, kicking your knight a second time — with still not one piece developed.
Let them. Each kick is a pawn move, not a developing move, and pawns never go backward.
Your move: Step the knight to b6.
3...Nb6 The knight steps to b6, out of the pawn's reach.
Your move: They kick again with c5 — a third pawn move. Hop the knight right back to d5, the best square on the board, where no pawn can ever kick it again.
4...Nd5 Back to d5 — the c-pawn ran past and can never attack that square again.
Your move: They finally take the middle with d4. Now one pawn move of yours bites two of theirs: d6 attacks e5 and c5 at the same time.
5...d6 One step with the d-pawn — it attacks both e5 and c5 at once.
Question: Four of their moves were pawn moves. One little d6 hits two of them. What happened here?
Answer: The chase fed itself to your bite — overextended pawns, zero development. Count their developed pieces one more time. Still zero. Whatever they save, something falls or trades off, and your pieces come out with threats against what remains. This is the Alekhine's promise: the harder they chase, the more there is to bite.
Final challenge: The Stampede (800 Elo)
The opponent says: Pawns, forward! I'll chase that pony off the board.
Your tasks in the game, in order:
Dangle the bait — knight to f6.
They charge — hop the knight to d5, the middle.
Start the bite — d6 attacks their proud e5 pawn.
They kick again — step the knight to b6, eyeing c4.
Position after 1.e4 Nf6 2.e5 Nd5 3.d4 d6 4.c4 Nb6. White to move.
History of the Alekhine's Defense
Alekhine's Defense begins 1.e4 Nf6 and occupies ECO codes B02 through B05. It is named after Alexander Alekhine, who used it in major tournament games in 1921 and helped establish its reputation. The opening entered regular international practice during the 1920s as a hypermodern defense that invited White's center forward before attacking it.
Main ideas for Black
Black attacks e4 immediately with Nf6, inviting e5 and then using Nd5 to make White spend time on pawn moves. After d4 and c4, the knight can retreat to b6 while d6 attacks the advanced e5 pawn. The target is White's broad pawn chain, especially d4 and e5, rather than immediate occupation of the center. White tries to use extra space and complete development before the advanced pawns become vulnerable.
Typical plans
In the main structures, White may hold pawns on c4, d4, and e5 while Black develops around them and attacks their bases. Black first uses d6 against e5, then looks for c5 or f6 to break the chain, while Nc6 and Bg4 add pressure to d4 and its defenders. If White exchanges on d6, an e-pawn recapture opens the f8 bishop and leaves targets on the central files. Black should finish development and castle before increasing the pressure.
Common mistakes
Moving the chased knight to a passive edge square gives up the opening's point; use d5 and b6 according to White's pawn advances.
Attacking White's pawn chain with pieces alone can leave Black cramped; play d6 and prepare c5 or f6 to challenge its base.
Repeatedly moving the same knight without developing anything else creates a real delay; once the chase ends, develop quickly and castle.
Related openings
Caro-Kann Defense1.e4 c6. Answer 1.e4 with a middle pawn that arrives guarded.
French Defense1.e4 e6. One pawn guards, the next one strikes the middle.