


Chess rules
Checkmate
Definition, the four-point checklist, thirteen named mating patterns and the fastest mates
Checkmate is the position that ends a chess game: the king is attacked, and no legal move can get it out of the attack. Not captured, not surrounded, simply unable to answer a check. This page states the rule exactly, separates it from check and from stalemate, gives a four-point checklist for deciding whether a position is mate, shows thirteen named mating patterns from back-rank mate to fool's mate with a board for the most common ones, and ends with a mate for you to find.
What checkmate is
Check means your king stands on a square that an enemy piece attacks. Checkmate means your king is in check and you have no legal move that ends the check. The game stops at that moment, and the side that gave the check wins. The king is never taken off the board: the rules forbid any move that leaves your own king in check, so a king with no escape is already beaten, and capturing it would be one move past the end of the game. The word itself is usually traced to the Persian shah mat, "the king is helpless", which is exactly the position it describes.
Three positions look alike from a distance and mean completely different things:
- 1.Check: the king is attacked, and you have at least one legal reply. You must play one of them right now.
- 2.Checkmate: the king is attacked, and no legal reply exists. You have lost.
- 3.Stalemate: the king is not attacked, but you have no legal move at all. The game is a draw.
The last two are the ones beginners mix up, and the mix-up costs half a point: a player with an extra queen who traps the enemy king without checking it has drawn a won game. The full comparison, with a position where one queen move mates and the other stalemates, is in stalemate vs checkmate.
The three ways out of check
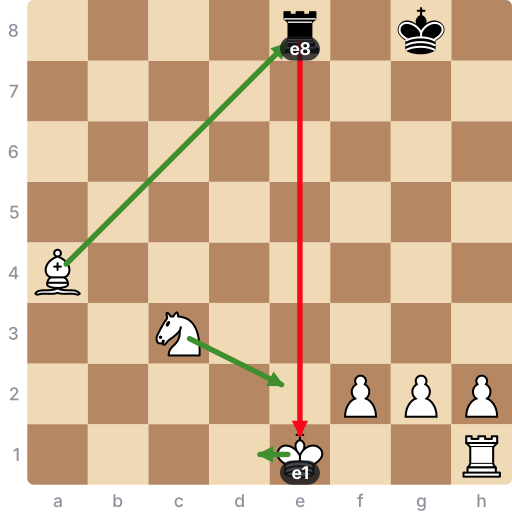
When your king is in check, the rules allow exactly three kinds of reply, and a useful habit is to run through them in the same order every time:
- 1.Run: move the king to a square that no enemy piece attacks.
- 2.Block: put one of your own pieces between the attacker and the king. This only works against a rook, bishop or queen attacking from a distance; a knight's check and a pawn's check cannot be blocked.
- 3.Capture: take the checking piece, with any piece, including the king itself if the attacker stands next to it and nothing defends it.
In the diagram, White has all three. The king can step to d1 or f1, the knight can drop in on e2, and the bishop on a4 can take the rook outright. Checkmate is the position where you go down the same list and every line fails: the squares around the king are attacked or filled by its own pieces, no piece can interpose, and the attacker is defended or out of reach. One special case: a double check, where one move uncovers two attackers at once, can only be answered by moving the king, because no single block or capture deals with both.
When is it checkmate? A four-point checklist
A position is checkmate when the answer to the first question is yes and the answer to the next three is no. Go through them in order before you claim a win or accept a loss.
- 1.Is the king in check? Some enemy piece must attack the king's square. A king that is not attacked is never checkmated, whatever else is on the board; if that king's side has no legal move at all, the position is stalemate and the game is a draw.
- 2.Can the king move to a safe square? Look at all eight neighbouring squares. Squares taken by its own pieces are out, and so are squares attacked by any enemy piece. A square on the far side of the king along the line of a rook, bishop or queen check is attacked too: once the king steps off, the line runs straight through.
- 3.Can a piece be put in the way? A check can be blocked only when there is an empty square between the attacker and the king, which means a queen, rook or bishop checking from a distance. A knight's check, a pawn's check and a check from the square next to the king cannot be blocked.
- 4.Can the checking piece be captured? Any piece may take it, including the king, unless the capture leaves the king in check: a pinned piece cannot capture, and the king cannot take a piece that is protected.
Two more rules settle the hard cases. A double check, two pieces giving check at once, is answered only by a king move, because one block or one capture cannot deal with both attackers. And a pinned piece still gives check: under the FIDE Laws of Chess a piece attacks a square even when it could not legally move there, so the king may not step onto a square that a pinned piece guards, and a pinned piece can deliver checkmate.
Five common mating patterns
Five mate patterns cover most games below club level: back-rank mate, scholar's mate, queen-and-king mate, the two-rook ladder mate, and smothered mate. Each one below has a diagram, the pieces it needs, and either the move that prevents it or the mistake that spoils it.
1. Back-rank mate
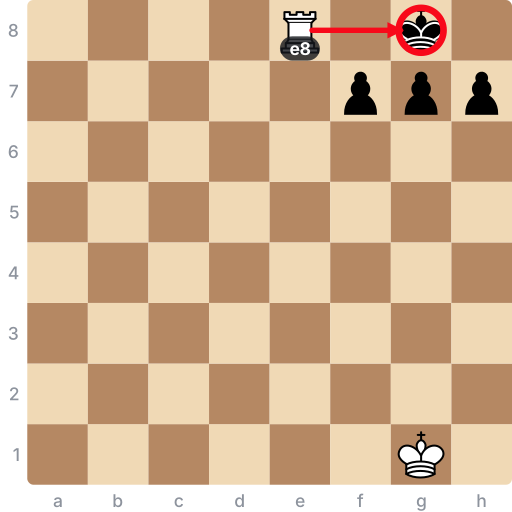
The most common mate in chess. After castling, the king sits behind three unmoved pawns, and those pawns become a wall. If the last defender of the back rank leaves or is traded off, a rook or queen arrives on the eighth rank with check, and the king cannot step forward because its own pawns are in the way. The diagram shows the bare version. The defence is to give the king an escape square in advance, usually by moving the h-pawn one step, once your rooks leave the first rank. Ask before every rook move whether your back rank still has a guard.
2. Scholar's mate: the four-move trap
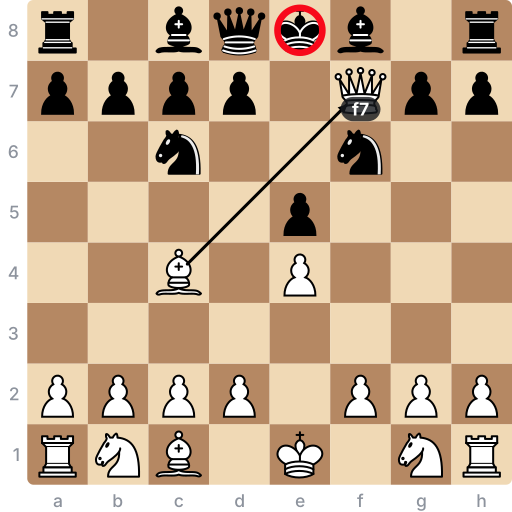
Scholar's mate is 1.e4 e5 2.Qh5 Nc6 3.Bc4 Nf6 4.Qxf7#. At the start of the game the pawn on f7 is guarded only by the king, so a queen on h5 and a bishop on c4 aim at the same weak point, and 4.Qxf7# is mate if Black ignores the threat. It ends thousands of beginner games. Defending it is simple once you know it: after 2.Qh5, play 2...Nc6 to guard e5, then answer 3.Bc4 with 3...g6, attacking the queen, or 3...Qe7, covering f7. As White, do not build your opening on it. Against anyone who has seen the trick, the early queen gets chased across the board while Black develops with gain of time, which breaks the opening principles that win games in the long run.
3. Queen and king vs king: box the king to the edge, then mate
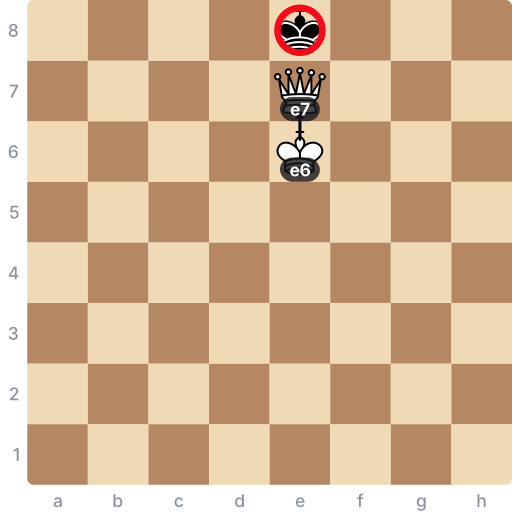
This is the mate you play when a pawn has promoted to a queen against a lone king. From any position it is forced in at most ten moves. A queen cannot checkmate a king in the open on her own; she needs the help of her king. The method has two stages. First, use the queen to box the enemy king towards an edge, keeping a knight's move away from it so it can never attack her. Then walk your own king up until it stands two squares from the enemy king, and deliver mate on the edge with the queen protected by the king, as in the diagram. The one danger is stalemate: a queen that takes away every square without giving check draws the game on the spot. Leave the trapped king one legal square until the move that actually mates.
4. Two-rook ladder mate
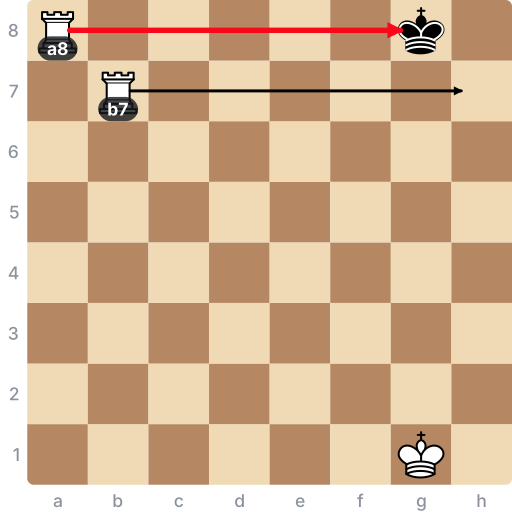
Two rooks, or a rook and a queen, can force mate without any help from the king. One rook takes a rank away from the enemy king, the other gives check on the next rank, and the king has to step back towards the edge. Then the rooks swap roles, rung by rung, until the king stands on the last rank and the final check has no answer. The only thing that can go wrong is leaving a rook within reach of the enemy king; when it is attacked, slide it along its rank to the far side of the board and carry on. The same pattern is also called the lawnmower mate or the staircase mate, after the way the rooks move down the board rank by rank.
5. Smothered mate
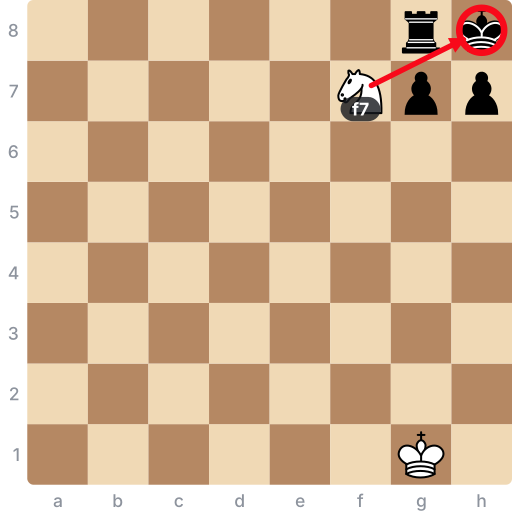
The knight is the one piece whose check cannot be blocked, and it jumps over anything in the way. So a king packed into a corner by its own pieces is in danger from a knight alone: no square to run to, nothing to block, and the knight itself often out of reach. The classic way to reach the diagram is a queen sacrifice: with the black king on h8 and a knight already on f7 or h6, the queen goes to g8 with check, the rook is forced to capture it, and the knight lands on f7 for mate. Smothered mate needs three things: the enemy king on a corner or edge square, its own pieces on every neighbouring square, and a knight giving check. It is prevented by one move: give the king a flight square, usually by moving the rook or a pawn beside it.
Seven more named mating patterns
Seven more mates have names of their own, taken from a player, a famous game or the shape they leave on the board. Two are shown on a board; the other five are given by their final position, so you can set them up and test each one against the checklist above.
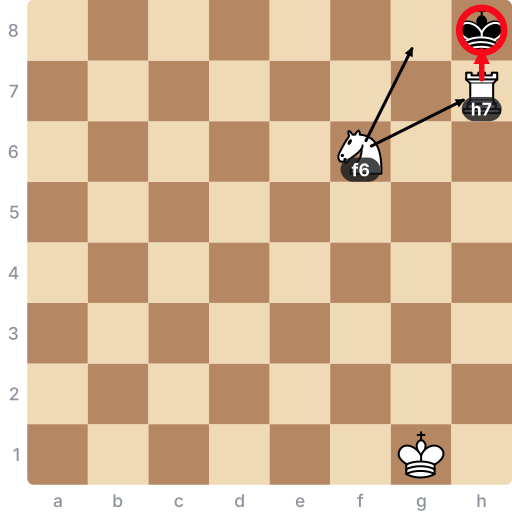
Arabian mate: a rook and a knight against a king in the corner. The rook gives check from the square beside the king, and the knight, two squares away on the diagonal, does two jobs at once: it protects the rook, so the king cannot take it, and it covers the corner's only other square. On the board, the rook on h7 checks the king on h8 and the knight on f6 guards both h7 and g8.
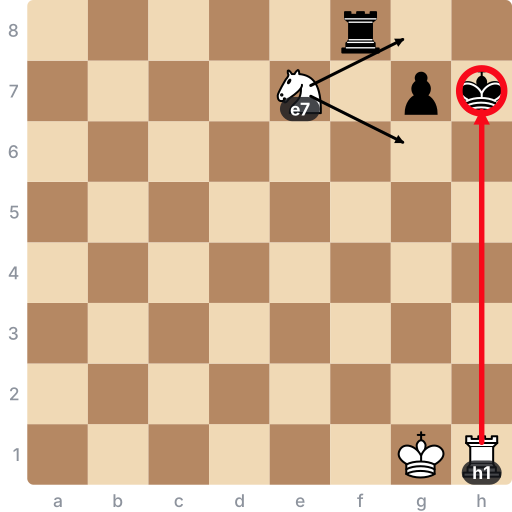
Anastasia's mate: a rook and a knight against a king on the edge of the board. The knight stands three files away from the king and covers the two squares next to it on the neighbouring file, the king's own pawn blocks the third, and the rook gives check along the edge file. On the board, the knight on e7 covers g8 and g6, the pawn on g7 blocks its own king, and the rook on h1 gives the check on the h-file.
Boden's mate: two bishops on crossing diagonals against a king that has castled on the queenside. One bishop gives check, the other covers the diagonal the king would run along, and the king's own rook and pawn close the rest. Final position: black king on c8, black rook on d8 and pawn on d7, white bishops on a6 and f4. The bishop on a6 checks through b7, the bishop on f4 covers b8 and c7, and the king has nothing left.
Epaulette mate: a queen gives check to a king on the edge of the board, and the king's own pieces, usually the two rooks, stand on the two squares beside it like epaulettes on a shoulder. The queen covers the three squares in front of the king, the rooks block the two at its sides, and the edge takes care of the rest. Final position: black king on e8 with rooks on d8 and f8, white queen on e6.
Opera mate: a rook gives check on the back rank while a bishop protects it from a distance and also covers the square in front of the king; the king's own pieces block the rest. It takes its name from the game Paul Morphy won against the Duke of Brunswick and Count Isouard at the Paris Opera in 1858, which ended with 17.Rd8#: the rook on d8 checks the king on e8, the bishop on g5 protects the rook and guards e7, and Black's own pieces fill the other squares.
Légal's mate: a bishop and two knights against a king that has not castled, reached by giving up the queen in the opening. One line: 1.e4 e5 2.Nf3 d6 3.Bc4 Bg4 4.Nc3 g6 5.Nxe5 Bxd1 6.Bxf7+ Ke7 7.Nd5#. Black takes the queen on d1 and is mated two moves later: after Bxf7+ the king has only e7, and the bishop on f7 with the knights on e5 and d5 then cover every square around it.
Damiano's mate: a queen gives check on h7, protected by a pawn on g6 or by a bishop, against a king on g8 that has lost the pawn in front of it. The pawn on g6 also covers f7, and the king's own rook on f8 blocks the last square, so Qh7 is mate. Final position: black king on g8 and rook on f8, white queen on h7 and pawn on g6.
The fastest checkmates
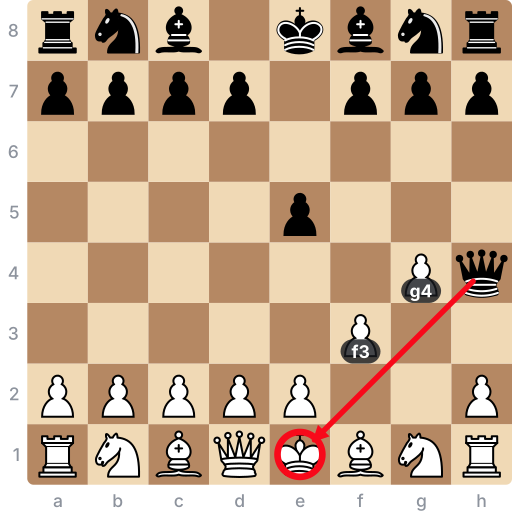
The shortest game possible ends on Black's second move: 1.f3 e5 2.g4 Qh4#, known as fool's mate. White's two pawn moves open the diagonal from h4 to e1, and the queen's check has no answer: no white piece can reach g3 or f2 to block, nothing can capture the queen, and the king's only free square, f2, lies on the same diagonal. It needs two poor moves from White in a row, so it is rare, but it shows what the f-pawn and g-pawn do: they are the king's cover.
White, who moves first, needs three moves for the same idea, for example 1.e4 g5 2.d4 f6 3.Qh5#. The black king on e8 has no free square, the check along the h5-e8 diagonal cannot be blocked, and nothing attacks the queen. The fastest mate that appears often in beginner games is scholar's mate in four moves, pattern number two above: queen and bishop both aim at f7, the one square beside the king that only the king defends.
How checkmate is written
Checkmate is written with a hash sign after the move: Qxf7#, Rd8#. A plain check gets a plus sign, Qh5+. The FIDE Laws of Chess accept ++ as well as # for checkmate; this site uses #. The result follows on the scoresheet: 1-0 if White delivered the mate, 0-1 if Black did. Every other symbol on a scoresheet is covered in the chess notation guide.
What happens after checkmate
The game ends the moment checkmate is on the board. Article 5.1.1 of the FIDE Laws of Chess gives the win to the player who checkmated and says the mate ends the game at once, provided the mating move itself was legal. Nothing is played after it: the king is never captured, because Article 1.4.1 forbids capturing the king, and no later event changes the result.
The scoresheet records 1-0 when White gave the mate and 0-1 when Black did, and the winner gets the full point. Checkmate is not the only ending. Article 5.1.2 lets a player resign, which gives the opponent the win in the same way. Stalemate, a player with no legal move and no check on the king, is a draw under Article 5.2.1, and so is a dead position, where no series of legal moves can lead to checkmate for either side, under Article 5.2.2.
Find the mate in one
Position: White queen on d1, Black king on g8 behind its own pawns on f7, g7 and h7, and no black piece on the back rank. White to move. Find the mate in one from the patterns above and play it.
White to move. The black king has three pawns in front of it and nothing on the back rank. Find the checkmate in one.
Tap a piece, then tap where it should go.
How to find mates in your own games
Three habits do most of the work. After every move, look at the enemy king and count its free squares; a king with none is one check away from mate, and a king with one is one quiet move away. When you are ahead in material, trade pieces and push the enemy king towards an edge, where every pattern on this page lives. And before any quiet move in a winning position, run the escape test from the other side: if your opponent's king is not in check and has no move, you have just stalemated them.
For practice, short games with the king already exposed teach mates faster than long games that end in resignation. Zapp Chess games start at a curated middlegame position with the armies already developed, and a game ends the moment one side is checkmated or goes two points of material ahead, so every game is a few moves of checks, captures and mating threats. Install the app and play on your phone.
Checkmate questions
What is the difference between check and checkmate?
Check means your king is attacked and you still have a legal way out: move the king, block the attack, or capture the attacker. Checkmate means your king is attacked and none of those three works. Check is a warning you must answer; checkmate ends the game.
Is the king captured in checkmate?
No. The rules forbid any move that leaves your own king in check, so a king with no escape is already lost and the game stops there. The king is never removed from the board.
What is the fastest checkmate in chess?
Fool's mate, in two moves: 1.f3 e5 2.g4 Qh4#. It only happens when White opens the diagonal to the king with both f- and g-pawns. The fastest common trap is scholar's mate in four moves, 1.e4 e5 2.Qh5 Nc6 3.Bc4 Nf6 4.Qxf7#.
Which pieces can force checkmate against a lone king?
King and queen, king and rook, king and two bishops, and king with bishop and knight can all force mate. A king with one knight or one bishop cannot, and neither can two knights against a king that defends correctly. Those endings are drawn.
How is checkmate written in chess notation?
With a hash sign after the move: Qxf7# or Rd8#. A plain check is written with a plus sign, Qh5+. The FIDE Laws of Chess accept ++ as well as # for checkmate; this site uses #.
What does the word checkmate mean?
It comes from the Persian phrase shah mat, usually translated as the king is helpless or the king is defeated. Players announced shah when the king was attacked, and mat when it could no longer be saved.
When is it checkmate in chess?
When the king is in check and none of the three escapes works: the king has no safe square to move to, no piece can be placed between the king and the attacker, and the attacker cannot be captured. All three must fail on the same move. A king that is not in check is never checkmated; if its side has no legal move at all, the position is stalemate and the game is a draw.
What is a staircase mate?
Another name for the ladder mate, also called the lawnmower mate: two rooks, or a rook and a queen, drive the enemy king to the edge of the board one rank at a time. One rook takes away the rank next to the king, the other gives check, and they take turns until the king stands on the last rank and the final check has no answer.
Can a pinned piece give checkmate?
Yes. Under the FIDE Laws of Chess a piece attacks a square even when it is pinned to its own king and could not legally move there. A pinned piece therefore still gives check, still guards the squares around the enemy king, and its check is checkmate when the king has no way out.
Keep going: chess rules, stalemate vs checkmate and chess strategies for beginners.
